Pyle SLPPTB22 Instruction Manual - Page 6
Step 3
 |
View all Pyle SLPPTB22 manuals
Add to My Manuals
Save this manual to your list of manuals |
Page 6 highlights
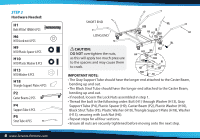
STEP 3 Hardware Needed: H1 Bolt M10x110MM 4.PCS H6 M10 Lock nut 4.PCS H9 M10 Plastic Spacer 4.PCS H10 M10 Plastic Washer 8.PCS H13 M10 Washer 8.PCS H18 Triangle Support Plates 4.PCS P2 Caster Beams 2.PCS P4 Support Tube 4.PCS P5 Strut Tube 4.PCS 6 www.SereneLifeHome.com SHORT END LONG END CAUTION: DO NOT overtighten the nuts, as this will apply too much pressure to the spacers and may cause them to crack. IMPORTANT NOTE: • The Gray Support Tube should have the longer end attached to the Caster Beam, bending up and out. • The Black Strut Tube should have the longer end attached to the Caster Beam, bending up and out. • If needed, loosen the Lock Nuts assembled in step 1. • Thread the bolt in the following order: Bolt (H1) through Washer (H13), Gray Support Tube (P4), Plastic Spacer (H9), Caster Beam (P2), Plastic Washer (H10), Black Strut Tube (P5), Plastic Washer (H10), Triangle Support Plate (H18), Washer (H13), securing with Lock Nut (H6). • Repeat steps for all four sections. • Ensure all nuts are securely tightened before moving onto the next step.
-
 1
1 -
 2
2 -
 3
3 -
 4
4 -
 5
5 -
 6
6 -
 7
7 -
 8
8 -
 9
9 -
 10
10 -
 11
11 -
 12
12 -
13
-
14
-
15
-
16
-
17
-
18
 |
 |
