Pyle PTBKD7BL Instruction Manual - Page 3
Using the Micro SD card, Inserting and Pulling out the Micro SD card
 |
View all Pyle PTBKD7BL manuals
Add to My Manuals
Save this manual to your list of manuals |
Page 3 highlights
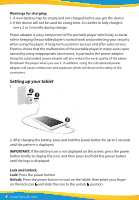
Screen Timeout: when you don't touch the screen or tap an icon or a button, the touchscreen dims then it turns o . In any state, short press " " button and for activation. Then skid the lock upwards to the green of spotted which will accomplish to access to the upper interface. If it is necessary to deactivate the contact screen timeout function, you can set the [Screen time out] option under [display] function into "Never". Using the Micro SD card After this unit is connected with the computer, you will nd two moving disks. The rst one is the built-in memory disk for this unit and the other is the disk for the MicroSD card. If no card is inserted, the second disk can not be opened. This unit supports the extension of the MicroSD card from 4GB to 32GB. Inserting and Pulling out the Micro SD card Inserting: Insert the Micro SD card face up (side with words), and slightly force the card into the socket of the card, i.e. connecting the unit. Under this state, you can play the Micro SD card content. Pulling: Slightly push the Micro SD, and it will bounce by a section, and then you can take it out. Caution: Please perform inserting and pulling operation when power is o ! Otherwise, it will lead to the loss or damage of les. If no card is inserted, the computer will unable to perform read and write operation for the disk notes of the later removable disk (Micro SD card). Battery: High capacity Polymer battery is used for this unit. The duration of the battery power depends on volume, types of playing les and operation of batteries. The player can set up the user as "user de ne power o time" or "display setup" to save batteries. Charging: This unit can be recharged by USB port, you can also use DC Charger (when DC port is available). Take out the DC charger, plug it into the wall outlet with AC 220V (output current 1500mAɼoutput voltage 5V~5.2V), then plug in the DC jack into the device DC-in jack. www.PyleUSA.com 3
-
 1
1 -
 2
2 -
 3
3 -
 4
4 -
 5
5 -
 6
6 -
 7
7 -
 8
8
 |
 |
