Polk Audio TC80i TCi Series Manual - Page 7
You Will Need, Follow These Easy Steps, Vous Aurez Besoin De, Suivez Ces Simples Etapes - in ceiling speakers
 |
View all Polk Audio TC80i manuals
Add to My Manuals
Save this manual to your list of manuals |
Page 7 highlights
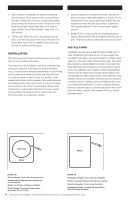
YOU WILL NEED: • Pencil for marking the location of installation. • Keyhole saw, utility knife or material-appropriate incising implement for cutting drywall or other wall material. • Level. • Screwdriver, preferably powered, with Phillips head bit. • Power drill with appropriate bit (optional, for starting wall cut). FOLLOW THESE EASY STEPS: • Make sure the material into which you plan to mount the speakers (plaster, drywall, paneling, stone, etc.) can support the weight of the speakers (see specification page for the weight of your model). • Make sure the locations you select do not conceal studs, electrical wiring or plumbing. Prior to installation, hold the speaker in your chosen location to make sure it safely clears obstacles such as studs, corners, beams, lighting fixtures and door/window frames. Your cutout must be at least 1" (25mm) from adjoining walls or ceiling, internal studs or plumbing. • Using the template, trace the installation location with a pencil. You can do this by holding the template in your preferred location and tracing around it (rectangle) or within the template pop-out area (round). Use a level to make certain the template is straight and plumb. This is the exact cutout size [figures 10a & 10b]. • Carefully cut the hole with the appropriate cutting tool for your wall or ceiling material. Start the hole by drilling a hole on the inside of the tracing (with the drill bit touching the line). Use this hole to insert the saw or knife and begin cutting [figure 11]. VOUS AUREZ BESOIN DE: • Un crayon pour marquer l'endroit de l'installation. • Une scie d'entrée, un couteau tout usage ou un outil permettant de couper du placoplâtre ou autre matériau du mur. • Un niveau. • Un tournevis à tête Phillips (préférablement électrique). • Une perceuse électrique avec mèche appropriée pour entamer l'embrasure (facultatif). SUIVEZ CES SIMPLES ETAPES: • Assurez-vous que le matériau dans lequel vous comptez installer vos haut-parleurs (plâtre, placoplâtre, lambris, pierre, etc.) peut supporter le poids des haut-parleurs (voir la fiche technique pour le poids du modèle de vos haut-parleurs). • Assurez-vous que l'endroit choisi pour l'installation murale ne dissimule pas de montants ou de solives, de fils électriques ou de plomberie. Avant son installation, tenez le haut-parleur à l'endroit choisi pour vous assurer qu'il sera suffisamment dégagé du plafond, des murs, des coins, des poutres, des luminaires et des cadres de portes et de fenêtres. L'embrasure doit être à au moins 25 mm (1 pouce) du mur ou du plafond adjacent, d'un montant ou d'une solive, ou de plomberie. • À l'aide du gabarit, tracez l'endroit de l'installation avec un crayon. Vous pouvez accomplir cette besogne en tenant le gabarit à l'endroit choisi et en traçant tout autour (modèles rectangulaires) ou en tracant l'intérieur du gabarit (modèles ronds). Utilisez un niveau pour vous assurer que le gabarit est bien droit et de niveau. C'est la taille exacte de l'embrasure [figures 10a et 10b]. FIGURE 11 Cut the hole with the appropriate tool. Haga el corte con la herramienta apropiada. Taillez l'ouverture avec l'outil approprié Schneiden Sie die Öffnung mit dem entsprechenden Werkzeug aus. L+EFT_ R+IGH_T AMP _+ _+ FIGURE 12 Hook up the speaker wires. Conecte los cables de los altavoces. Branchez les fils de haut-parleur. Schließen Sie die Lautsprecherkabel an. For Customer Service, call 800-377-7655. 7
-
 1
1 -
 2
2 -
 3
3 -
 4
4 -
 5
5 -
 6
6 -
 7
7 -
 8
8 -
 9
9 -
 10
10 -
 11
11 -
 12
12
 |
 |
