Polk Audio RC6s RC6 Manual - Page 8
Bornes A Ressort, Installation Dans Le Mur, Ou Dans Le Plafond, Using Spring Clip Connectors, In-
 |
View all Polk Audio RC6s manuals
Add to My Manuals
Save this manual to your list of manuals |
Page 8 highlights
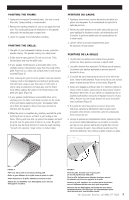
USING SPRING CLIP CONNECTORS Push the Push Post "in" to open the hole located on the post. Insert bare wire onto the hole and release the post, which grasps the wire and makes the connection. Do not insert the insulated section of speaker wire; this will result in poor connection. Repeat for each terminal [Figure 8]. BORNES A RESSORT Appuyez sur le dessus de la borne pour faire apparaitre le trou situé sur la paroi de la borne. Insérez la partie dénudée du fil dans le trou et relâchez la borne pour bien coincer le fil. N'insérez pas la partie isolée du fil dans le trou car le contact ne se fera pas. Répétez cette opération pour chaque borne [Figure 8]. IN-WALL MOUNTING 1. To mount the speaker, make sure that the rotating wall clamps are flipped inwards so that your speaker fits into your cutout without nicking your wall. Then place the speaker carefully into the cutout. [Figure 9] Tighten the wall clamp screws with a screwdriver. This will rotate the wall clamps and secure the speaker to the wall. [Figure 10] Hint: Do not overtighten the wall clamp screws. 2. Carefully reinstall the grille by fitting it into its recess so that it is just resting on the frame. Starting with one corner, go around the speaker and push the grille into the grille notch a little bit at a time. Be gentle; the grille may be easily bent out of shape by rough handling. INSTALLATION DANS LE MUR OU DANS LE PLAFOND 1. Pour installer le haut-parleur, assurez-vous d'abord que les crampons muraux rotatifs sont dirigés vers l'intérieur de façon à ce que votre haut-parleur puisse pénétrer l'embrasure sans érafler le mur ou le plafond. Placez ensuite délicatement le haut-parleur dans l'embrasure [Figure 9]. Serrez les vis des crampons muraux à l'aide d'un tournevis. Cela fera tourner les crampons qui fixeront solidement votre haut-parleur au mur ou au plafond [Figure 10]. Il est important de ne pas trop serrer les vis des crampons. 2. Réinstallez soigneusement la grille en la posant d'abord délicatement sur l'encoche du cadre. En commençant par un coin, poussez petit à petit la grille dans son encoche tout autour du cadre. Soyez délicat, la grille peut être facilement déformée. Vous sentirez la grille «cliquer» en place. L+EFT_ R+IGH_T AMP _+ _+ FIGURE 8 Hook up the speaker wires. Conecte los cables de los altavoces. Branchez les fils de haut-parleur. Schließen Sie die Lautsprecherkabel an. FIGURE 9 Place the speaker carefully into the cutout. Coloque cuidadosamente el altavoz en el agujero. Placez délicatement le haut-parleur dans l'ouverture. Platzieren Sie die Lautsprecher vorsichtig in der ausgeschnittenen Öffnung. 8 Get more information and exclusive accessories, visit www.polkaudio.com
-
 1
1 -
2
-
 3
3 -
 4
4 -
 5
5 -
 6
6 -
 7
7 -
 8
8 -
 9
9 -
 10
10 -
 11
11 -
 12
12
 |
 |
