Polk Audio DB522 User Guide - Page 11
Surface mount tweeter mounting - speakers
 |
View all Polk Audio DB522 manuals
Add to My Manuals
Save this manual to your list of manuals |
Page 11 highlights
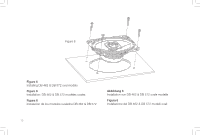
E DB 5252, DB 6502 Figure 11 Figure 11 Surface mount tweeter mounting 1. Using the base of the surface mount cup as a template, mark the screw hole and drill them using a 1/8" (3mm) drill bit. Drill a second hole (for the speaker wire) using a 3/16" (5mm) drill bit. 2. Screw surface mount cup to the panel. 3. Push the tweeter wires through the open area at the bottom of the cup and through the 3/16" (5mm) hole in the panel. 4. Connect wires from the tweeter terminals of the Crossover to the tweeter wires using fast on connectors. Be sure to connect the red wire strand from the tweeter to the (+) terminal of the crossover tweeter output. 5. Mount the tweeter by snapping it into the mounting cup. 19
-
 1
1 -
2
-
3
-
4
-
5
-
 6
6 -
 7
7 -
 8
8 -
 9
9 -
 10
10 -
 11
11 -
 12
12 -
 13
13 -
 14
14 -
 15
15 -
 16
16
 |
 |

19
DB 5252, DB 6502
Figure 11
Surface mount tweeter mounting
1.
Using the base of the surface mount cup as a
template, mark the screw hole and drill them
using a 1/8” (3mm) drill bit. Drill a second hole
(for the speaker wire) using a 3/16” (5mm) drill bit.
2.
Screw surface mount cup to the panel.
3.
Push the tweeter wires through the open area at the bottom of the
cup and through the 3/16” (5mm) hole in the panel.
4.
Connect wires from the tweeter terminals of the Crossover to the tweeter wires using fast on
connectors. Be sure to connect the red wire strand from the tweeter to the (+) terminal of the
crossover tweeter output.
5.
Mount the tweeter by snapping it into the mounting cup.
Figure 11