Philips 34E1C5600HE User manual - Page 14
Noise Cancelling, 5 Remove the Base Assembly, for VESA Mounting
 |
View all Philips 34E1C5600HE manuals
Add to My Manuals
Save this manual to your list of manuals |
Page 14 highlights
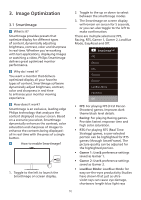
2.4 Noise Cancelling This monitor has Noise Cancelling functionality. When connected via USB-C during video conferencing, the monitor will automatically filter for human sounds. This function can be turned off in the OSD menu, under Noise Cancelling (default=ON). Note If multiple devices are connected to the display, both may play through the speaker at the same time. It is recommended to disable the audio output of the non-primary device. 2.5 Remove the Base Assembly for VESA Mounting Before you start disassembling the monitor base, please follow the instructions below to avoid any possible damage or injury. 1. Place the monitor face down on a smooth surface. Pay attention not to scratch or damage the screen. Then lift the monitor stand. 2. While keeping the release button pressed, tilt the base and slide it out. Note This monitor accepts a 100mm x 100mm VESA-Compliant mounting interface. VESA Mounting Screw M4. Always contact manufacturer for wall-mount installation. 12
-
 1
1 -
2
-
3
-
4
-
5
-
6
-
7
-
8
-
 9
9 -
 10
10 -
 11
11 -
 12
12 -
 13
13 -
 14
14 -
 15
15 -
 16
16 -
 17
17 -
 18
18 -
 19
19 -
20
-
21
-
22
-
23
-
24
-
25
-
26
-
27
-
28
-
29
-
30
-
31
-
32
-
33
-
34
-
35
-
36
 |
 |
