Panasonic TH-85PF12U 85" Plasma Tv - Page 47
Multi Pip Setup
 |
UPC - 037988242801
View all Panasonic TH-85PF12U manuals
Add to My Manuals
Save this manual to your list of manuals |
Page 47 highlights
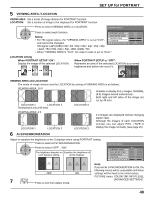
MULTI PIP SETUP Set the two-screen display function that is activated when 1 Press to display the SET UP menu. 2 Press to select the MULTI PIP SETUP. is pressed. Press to display the "MULTI PIP SETUP" menu. 3 Press to select the menu to adjust. Press to adjust the menu. MULTI PIP DISPLAY MODE SET UP 2/2 MULTI DISPLAY SETUP MULTI PIP SETUP PORTRAIT SETUP SET UP TIMER MULTI PIP SETUP MULTI PIP DISPLAY MODE TRANSPARENCY TRANSPARENCY LEVEL INSERT INSERT LEVEL BLEND PIP - OFF 0 % OFF 1 Set the two-screen function. PIP ADVANCED PIP BLEND PIP The display mode can be changed separately for each function that was set in "MULTI PIP SETUP". For "PIP": - (One screen) P AND P P OUT P P IN P For "ADVANCED PIP": - (One screen) 1 to 8 For "BLEND PIP": - (One screen) FULL P IN P Note: The display mode changes in the same way when is pressed. Transparent Display of the Sub Screen (During BLEND PIP) 1 Select "ON" in "TRANSPARENCY". 2 Set the transparency level for the sub screen in "TRANSPARENCY LEVEL". (0 to 100 %) Setting example Transparent image (sub screen) 0 %: No transparency Note: "INSERT" cannot be set when "TRANSPARENCY" is "ON". 100 %: Fully transparent Sub Screen Insertion (During BLEND PIP) 1 Select "ON" in "INSERT". 2 Set the "INSERT LEVEL". (1 to 10 %) Set the brightness level threshold for discriminating between the transparent areas and non-transparent areas on the sub screen. Setting example Image to insert (sub screen) INSERT LEVEL 10 % Only the areas on the overlay image that are brighter than the "INSERT LEVEL" are displayed on the background Background image (main screen) image. Two-picture insertion 1 % Note: "TRANSPARENCY" cannot be set when "INSERT" is "ON". 47
-
 1
1 -
2
-
3
-
4
-
5
-
6
-
7
-
8
-
9
-
10
-
11
-
12
-
13
-
14
-
15
-
16
-
17
-
18
-
19
-
20
-
21
-
22
-
23
-
24
-
25
-
26
-
27
-
28
-
29
-
30
-
31
-
32
-
33
-
34
-
35
-
36
-
37
-
38
-
39
-
40
-
41
-
 42
42 -
 43
43 -
 44
44 -
 45
45 -
 46
46 -
 47
47 -
 48
48 -
 49
49 -
 50
50 -
 51
51 -
 52
52 -
53
-
54
-
55
-
56
-
57
-
58
-
59
-
60
-
61
-
62
-
63
-
64
-
65
-
66
-
67
-
68
-
69
-
70
-
71
-
72
 |
 |
