Panasonic AWRP605 AWRP605 User Guide - Page 6
R/B GAIN/PED button, LCD CONTRAST control
 |
View all Panasonic AWRP605 manuals
Add to My Manuals
Save this manual to your list of manuals |
Page 6 highlights
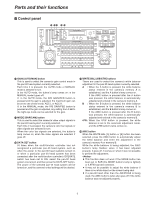
Parts and their functions $ Control panel FH ? B @ A C ED G OPERATE ON OFF INCOM IRIS ZOOM FOCUS OPEN TELE FAR GAIN WHITE BAL AUTO A MANU AWC MODE BAR CAM DATA SET B NG OK ABC ATW CALL TR/PSET M.LOCK 1 2 3 LEVEL IRIS CLOSE WIDE NEAR TELE TR PSET MEMORY 11 12 13 AUTO MANU LOCK EMPTY 21 22 23 IRIS FOCUS 31 32 33 CAMERA CONTROL CAMERA CONTROL TRACING/PRESET MEMORY 4 5 6 7 14 15 16 17 24 25 26 27 34 35 36 37 LCD CONTRAST LAMP DEF PAN/TILT SET WIP H/F EXT ND OPTION START R/B GAIN/PED MENU OK POINT TRACING MEMORY START/STOP RESTORE RESET 8 9 10 PRIORITY TALLY 1 2 3 4 5 AUX 18 19 20 SPEED CONTROL/PREVIEW MONITOR OUT SEL UP FULL LOW HIGH 28 29 130 IRIS FOCUS 38 39 40 L R CLOSE NEAR WIDE OPEN FAR ZOOM/FOCUS/IRIS 41 42 43 44 45 46 47 48 49 50 LIMIT ON LIMIT OFF CLOSE NEAR DOWN OPEN FAR PA N / T I LT / F O C U S / I R I S ? ABC button This is used to automatically adjust camera's black balance in the pan-tilt head system currently selected. Set the IRIS [AUTO/MANU/LOCK] button to AUTO (the IRIS button is now lighted), and press the ABC button. While the black balance is being adjusted, the ABC button's lamp flashes; when it has been adjusted properly, it goes off. It comes on when it was not possible to perform the adjustment. If a pan-tilt head other than the AW-PH350 is being used, the ABC button's lamp also goes off if the black balance was not adjusted properly. @ LCD panel This displays the statuses of the current settings. A CAMERA CONTROL lamp This comes on when communication with the camera in the currently selected pan-tilt head system has been established properly. It goes off when there is a problem with the communication. If a pan-tilt head other than the AW-PH350 is being used, the lamp will remain off even if communication has been established properly. B Menu setting control (L) This is used to change the item or the value of the item displayed on the left at the bottom of the LCD panel in the setting menu mode. C Menu setting control (R) This is used to change the item or the value of the item displayed on the right at the bottom of the LCD panel in the setting menu mode. D Menu setting control (main) This is used to select the item or change the value of the item displayed at the top of the LCD panel in the setting menu mode. E R/B GAIN/PED button Press this button to adjust the camera's R/B gain or R/B pedestal in the pan-tilt head system currently selected. Each time it is pressed, the adjustment mode is set to ON or OFF in turn. When the adjustment mode is set to ON, the button's lamp comes on; when it is OFF, the lamp goes off. F MENU button This is used to select ON or OFF for the setting menu mode of the pan-tilt head system currently selected. Each time it is pressed, the menu mode is set to ON or OFF in turn. When the setting menu mode is set to ON, the button's lamp comes on, and the setting menu appears on the LCD panel. In this status, the MENU button is used to select the setting menu items as well. When the setting menu mode is set to OFF, the button's lamp goes off, and the LCD panel returns to its original display. G LCD CONTRAST control This is used to adjust the contrast of the LCD panel. H OK button This is pressed to select setting menu items or to enter the values of items. It is possible to switch the speed at which the setting value of some of the items in the setting menu changes each time jog dial B, C or D is pressed. (See pages 36 and 37) Note that this function may not work with the AW-RP615 Control Panel (optional accessory). 6
-
 1
1 -
 2
2 -
 3
3 -
 4
4 -
 5
5 -
 6
6 -
 7
7 -
 8
8 -
 9
9 -
 10
10 -
 11
11 -
 12
12 -
13
-
14
-
15
-
16
-
17
-
18
-
19
-
20
-
21
-
22
-
23
-
24
-
25
-
26
-
27
-
28
-
29
-
30
-
31
-
32
-
33
-
34
-
35
-
36
-
37
-
38
-
39
-
40
-
41
-
42
-
43
-
44
-
45
-
46
-
47
-
48
-
49
-
50
-
51
-
52
-
53
-
54
-
55
-
56
-
57
-
58
-
59
-
60
-
61
-
62
-
63
-
64
-
65
-
66
-
67
-
68
-
69
-
70
-
71
-
72
-
73
-
74
-
75
-
76
-
77
-
78
-
79
-
80
-
81
-
82
-
83
-
84
-
85
-
86
-
87
-
88
-
89
-
90
-
91
-
92
 |
 |
