Panasonic AW-RP60 Operating Instructions - Page 28
RP IP SET 3/3
 |
View all Panasonic AW-RP60 manuals
Add to My Manuals
Save this manual to your list of manuals |
Page 28 highlights
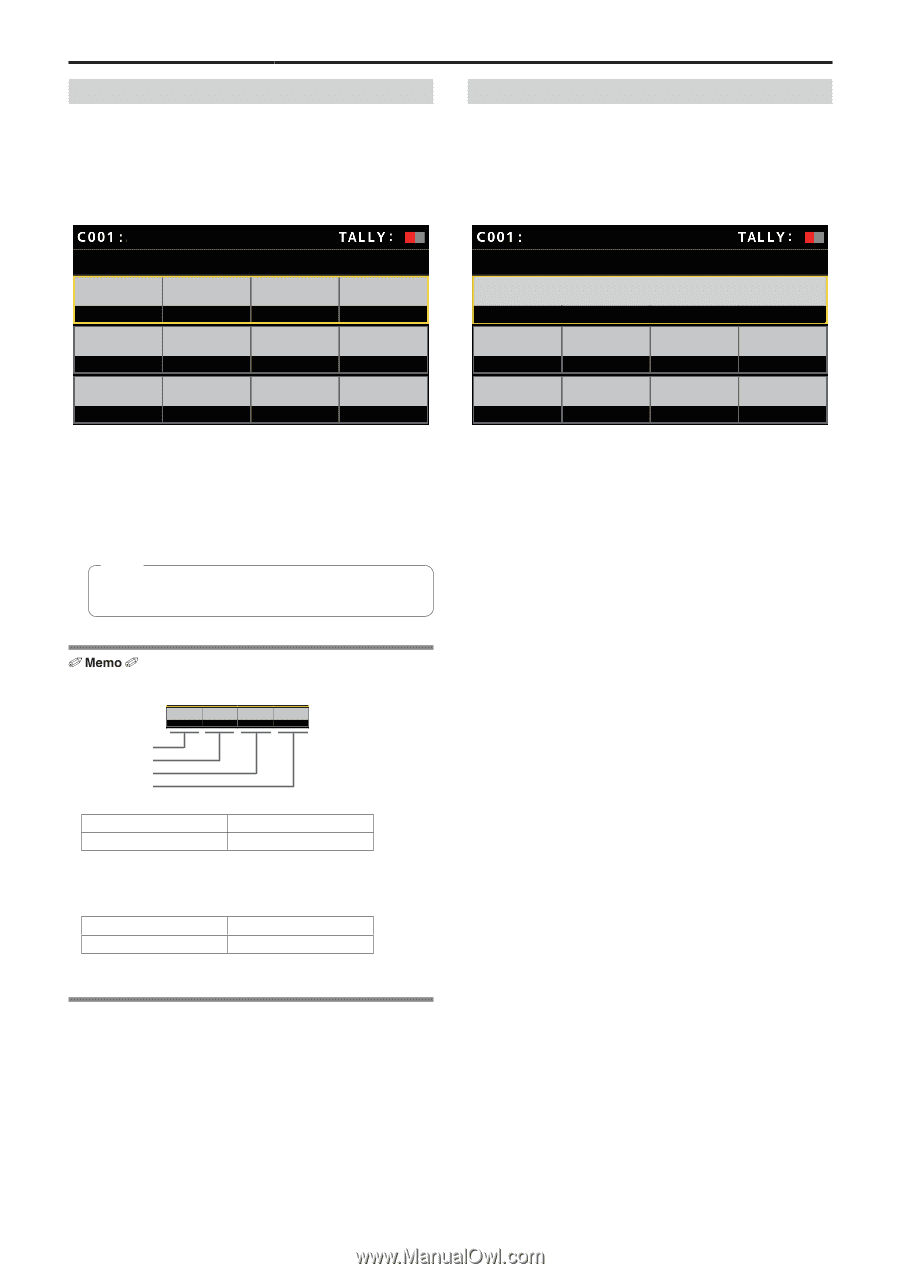
Network settings of the unit (continued) Setting the default gateway 1. Press the [MENU] button. 2. Select the [RP IP SET] SYSTEM menu. 3. Operate the menu operation dials to select the [GATEWAY] item and then press to confirm. AW-UE70 RP IP SET 2/3 GATEWAY 192 PORT C1 61000 PORT C5 61008 168 PORT C2 61002 0 PORT C3 61004 1 PORT C4 61006 zzThis is set to [192.168.0.1] by default. 4. Use the menu operation dials to set the default gateway of the unit. Enter this in 4 blocks of numerals. If you did not execute [UPLOAD] at the first line of first screen (1/3), the content you have changed cannot be set. Note zzIn order for the setting to take effect, the unit must be restarted. Turn off the unit's power, and then turn it back on. Displaying the MAC address 1. Press the [MENU] button. 2. Select the [RP IP SET] SYSTEM menu. 3. Operate the menu operation dials to select the [MAC ADDRESS] item and then press to confirm. AW-UE70 RP IP SET 3/3 MAC ADDRESS zzThe MAC address can only be displayed. It cannot be changed. Settable addresses IP 192 168 0 xxx Block 1 Block 2 Block 3 Block 4 zzFor the IP address, you can set values within the following ranges. Block 1: 1 to 223 Block 2: 0 to 255 Block 3: 0 to 255 Block 4: 1 to 254 However, [127.0.0.1] cannot be set even though it is within the above ranges. zzFor the subnet mask, you can set values within the following ranges. Block 1: 0 to 255 Block 2: 0 to 255 Block 3: 0 to 255 Block 4: 0 to 255 However, [0.0.0.0] and [127.0.0.1] cannot be set even though they are within the above ranges. 28
-
 1
1 -
2
-
3
-
4
-
5
-
6
-
7
-
8
-
9
-
10
-
11
-
12
-
13
-
14
-
15
-
16
-
17
-
18
-
19
-
20
-
21
-
22
-
 23
23 -
 24
24 -
 25
25 -
 26
26 -
 27
27 -
 28
28 -
 29
29 -
 30
30 -
 31
31 -
 32
32 -
 33
33 -
34
-
35
-
36
-
37
-
38
-
39
-
40
-
41
-
42
-
43
-
44
-
45
-
46
-
47
-
48
-
49
-
50
-
51
-
52
-
53
-
54
-
55
-
56
-
57
-
58
-
59
-
60
-
61
-
62
-
63
-
64
-
65
-
66
-
67
-
68
-
69
-
70
-
71
-
72
-
73
-
74
-
75
-
76
-
77
-
78
-
79
-
80
-
81
-
82
-
83
-
84
-
85
-
86
-
87
-
88
-
89
-
90
 |
 |