Panasonic AGHVX200P Memory Card Camcorder - Page 43
Zebra pattern, Marker, Image level detection area, Image level, ZEBRA 1
 |
View all Panasonic AGHVX200P manuals
Add to My Manuals
Save this manual to your list of manuals |
Page 43 highlights
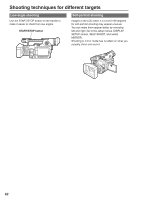
Zebra pattern Press the ZEBRA button in the camera mode to show the zebra pattern or marker on the screen so you can check the brightness of the subject. Parts that may be whited out through over exposure are shown as a zebra pattern. • Very bright • Reflecting parts You can remove most overexposed parts by adjusting the iris and shutter speed in the manual mode to remove the areas with zebra patterns. The display changes as follows each time you press the ZEBRA button. BARS RESET SHUTTER SPEED SEL CH 1 SELECT CH 2 SELECT INPUT 1 INPUT 2 INT(L) INPUT 1 INPUT 2 INT(R) INPUT 2 ON ON OFF OFF AUDIO MIC POWER +48V COUNTER RESET/TC SET ZEBRA OIS ZEBRA 1 → ZEBRA 2 ↑ ↓ OFF ← MARKER Marker If you press the ZEBRA button again while the zebra pattern is being displayed, a marker appears in the center of the display (if you have set the setup menu, DISPLAY SETUP, MARKER to ON). The brightness of the areas near the screen center can be checked as a percentage (0% to 99%). "99%↑" appears if the percentage is over 99. Image level detection area Marker Image level The normal display reappears if you press the ZEBRA button again. In the setup menus, DISPLAY SETUP screen, ZEBRA DETECT 1 and ZEBRA DETECT 2, set the brightness for the zebra patterns. (Page 112) The zebra pattern you have set appears as a percentage on the display for about 2 seconds. Shooting 43
-
 1
1 -
2
-
3
-
4
-
5
-
6
-
7
-
8
-
9
-
10
-
11
-
12
-
13
-
14
-
15
-
16
-
17
-
18
-
19
-
20
-
21
-
22
-
23
-
24
-
25
-
26
-
27
-
28
-
29
-
30
-
31
-
32
-
33
-
34
-
35
-
36
-
37
-
 38
38 -
 39
39 -
 40
40 -
 41
41 -
 42
42 -
 43
43 -
 44
44 -
 45
45 -
 46
46 -
 47
47 -
 48
48 -
49
-
50
-
51
-
52
-
53
-
54
-
55
-
56
-
57
-
58
-
59
-
60
-
61
-
62
-
63
-
64
-
65
-
66
-
67
-
68
-
69
-
70
-
71
-
72
-
73
-
74
-
75
-
76
-
77
-
78
-
79
-
80
-
81
-
82
-
83
-
84
-
85
-
86
-
87
-
88
-
89
-
90
-
91
-
92
-
93
-
94
-
95
-
96
-
97
-
98
-
99
-
100
-
101
-
102
-
103
-
104
-
105
-
106
-
107
-
108
-
109
-
110
-
111
-
112
-
113
-
114
-
115
-
116
-
117
-
118
-
119
-
120
-
121
-
122
-
123
-
124
-
125
-
126
-
127
-
128
-
129
-
130
-
131
-
132
-
133
-
134
 |
 |
