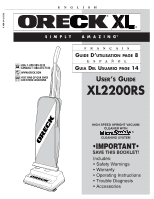
Oreck XL2200RS Owners Guide - Page 5
eplace, ilter - belts
 |
View all Oreck XL2200RS manuals
Add to My Manuals
Save this manual to your list of manuals |
Page 5 highlights
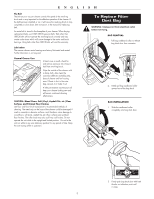
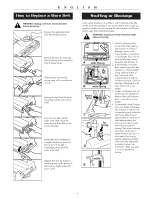
ENGLISH The Belt The belt on your vacuum cleaner controls the speed of the revolving brush and is very important for the effective operation of the cleaner. If the belt becomes stretched or cut, it will cause the revolving brush to stop completely or slow down. See instructions in the manual for replacing belt. An extra belt is stored in the baseplate of your cleaner. When buying replacement belts, use ONLY ORECK genuine belts. Belts other than ORECK belts will not operate the revolving brush correctly and may create undue stress which will cause damage to the motor and brush bearings. Using belts other than ORECK belts will void the warranty. Lubrication The vacuum cleaner motor bearings are factory lubricated and seated. Further lubrication is not required. General Cleaner Care At least once a month, check for and remove excessive lint, string or hair from revolving brush. Wipe the outside of the cleaner with a damp cloth. Also clean the connector deflector assembly area, base of cleaner and fan housing area. If there is dust in the outer bag, vacuum it or shake it out. A little preventative maintenance will keep your cleaner looking new and will ensure continued cleaning effectiveness. CAUTION-Wood Floors, Soft (Vinyl, Asphalt Tile, etc.) Floor Surfaces and Polished Floor Finishes Use floor and floor finish manufacturer's recommended methods of cleaning. The metal strip on the base of the cleaner could be damaged if used on concrete or abrasive surfaces, and, therefore, cause damage to wood floors, soft (vinyl, asphalt tile, etc.) floor surfaces and polished floor finishes. The roller brush may also scuff very soft finishes. Do not operate the unit while in the upright and locked position. Do not let the unit run while in any one stationary position for any period of time. Keep the unit moving while in operation. To Replace Filter Dust Bag WARNING: Unplug cord from electrical outlet before servicing. BAG REMOVAL: 1. Pull bag cardboard collar to release bag dock door from connector. 2. Gently pul bag cardboard collar upward out of the bag dock. BAG INSTALLATION: 1. Slide the cardboard collar completely onto bag dock door. PRESS UNTIL SNAP IS HEARD ENFONCEZ JUSQU'À TNE DNE RBNUE RIU T PRIES HNEO ATS A HCUSE ARNU HC AIQUS DDO IECJUS ÓN 2. Firmly push bag dock door with both thumbs on indication point until it snaps. 5
-
 1
1 -
 2
2 -
 3
3 -
 4
4 -
 5
5 -
 6
6 -
 7
7 -
 8
8 -
 9
9 -
 10
10 -
 11
11 -
12
-
13
-
14
-
15
-
16
-
17
-
18
-
19
-
20
 |
 |
