Oki ES9465 ES9465/ES9475 Printing Guide - Page 79
Tray 1, 2 & Tray 3
 |
View all Oki ES9465 manuals
Add to My Manuals
Save this manual to your list of manuals |
Page 79 highlights
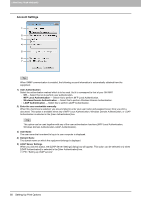
2.PRINTING FROM WINDOWS 2 PRINTING FROM WINDOWS 2) Option This option sets whether the following optional devices are installed. Trays This sets the installation of drawers according to the configuration. - Tray1 - Select this when only Tray 1 is installed. - Tray 1 & Tray 2 - Select this when Trays 1 and 2 are installed. - Tray 1, 2 & Tray 3 - Select this when Trays 1, 2 and 3 are installed. - Tray 1, 2 & Tray 3, 4 - Select this when Trays 1, 2, 3 and 4 are installed. - Tray 1, 2 & LCF - Select this when Trays 1, 2 and the Large Capacity Feeder are installed. 3) Finisher This sets whether or not the Finisher is installed. - None - Select this when a Finisher is not installed. - Finisher - Select this when a Finisher is installed. - Saddle Stitch Finisher - Select this when a Saddle Stitch Finisher is installed. - Job Separator - Select this when a Job Separator is installed. 4) Hole Punch Unit This sets whether or not the Hole Punch Unit is installed. - None - Select this when a Hole Punch Unit is not installed. - 2 Holes - Select this when a 2 Hole Punch Unit is installed. - 2/3 Holes - Select this when a 2/3 Hole Punch Unit is installed. - 4 Holes (F) - Select this when a 4 hole (F) punch unit is installed. - 4 Holes (S) - Select this when a 4 hole (S) punch unit is installed. 5) [Tray Settings] Click this to set the paper size and paper type of each tray. The [Tray Settings] dialog box appears by clicking this. P.79 "Tray Settings" 6) [Account Settings] Click this button to set whether the user management setting is enabled or not. You can also set whether the Private Print Restriction function and Hold Print Restriction function are enabled or not. The [Account Settings] dialog box appears upon clicking this button. P.80 "Account Settings" Setting Up Print Options 77
-
 1
1 -
2
-
3
-
4
-
5
-
6
-
7
-
8
-
9
-
10
-
11
-
12
-
13
-
14
-
15
-
16
-
17
-
18
-
19
-
20
-
21
-
22
-
23
-
24
-
25
-
26
-
27
-
28
-
29
-
30
-
31
-
32
-
33
-
34
-
35
-
36
-
37
-
38
-
39
-
40
-
41
-
42
-
43
-
44
-
45
-
46
-
47
-
48
-
49
-
50
-
51
-
52
-
53
-
54
-
55
-
56
-
57
-
58
-
59
-
60
-
61
-
62
-
63
-
64
-
65
-
66
-
67
-
68
-
69
-
70
-
71
-
72
-
73
-
 74
74 -
 75
75 -
 76
76 -
 77
77 -
 78
78 -
 79
79 -
 80
80 -
 81
81 -
 82
82 -
 83
83 -
 84
84 -
85
-
86
-
87
-
88
-
89
-
90
-
91
-
92
-
93
-
94
-
95
-
96
-
97
-
98
-
99
-
100
-
101
-
102
-
103
-
104
-
105
-
106
-
107
-
108
-
109
-
110
-
111
-
112
-
113
-
114
-
115
-
116
-
117
-
118
-
119
-
120
-
121
-
122
-
123
-
124
-
125
-
126
-
127
-
128
-
129
-
130
-
131
-
132
-
133
-
134
-
135
-
136
-
137
-
138
-
139
-
140
-
141
-
142
-
143
-
144
-
145
-
146
-
147
-
148
-
149
-
150
-
151
-
152
-
153
-
154
-
155
-
156
-
157
-
158
-
159
-
160
-
161
-
162
-
163
-
164
-
165
-
166
-
167
-
168
-
169
-
170
-
171
-
172
-
173
-
174
-
175
-
176
-
177
-
178
-
179
-
180
-
181
-
182
-
183
-
184
-
185
-
186
-
187
-
188
-
189
-
190
-
191
-
192
-
193
-
194
-
195
-
196
-
197
-
198
-
199
-
200
-
201
-
202
-
203
-
204
 |
 |
