NEC NP-PA1705UL-B User Manual - Page 77
Mounting a lens (sold separately), Mounting
 |
View all NEC NP-PA1705UL-B manuals
Add to My Manuals
Save this manual to your list of manuals |
Page 77 highlights
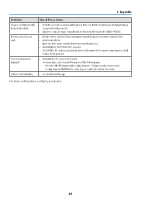
3. Appendix 3-3. Mounting a lens (sold separately) Six separate bayonet style lenses can be used with this projector. The descriptions here are for the NP54ZL lens. Mount other lenses in the same manner. After installing or replacing the lens unit, press the ZOOM/L-CALIB. button on the projector to carry out [LENS CALIBRATION]. By carrying out [LENS CALIBRATION], the adjustment range of the lens shift is calibrated. WARNING: (1) Turn off the power and wait for the cooling fan to stop, (2) disconnect the power cord and wait for the unit to cool before mounting or removing the lens. Failure to do so can result in eye injury, electric shock, or burn injuries. Important: • The projector and lenses are made of precision parts. Do not subject them to shock or excessive forces. • Remove the separately sold lens when moving the projector. If not, the lens could be subject to shock while the projector is being moved, damaging the lens and the lens shift mechanism. • If the projector must be moved with the lens unit attached, such as when it is installed in a high or specific location, use the screws included with the lens unit to secure it to the projector. Do not hold the lens when moving the projector. • When dismounting the lens from the projector, return the lens position to the home position before turning off the power. Failure to do so may prevent the lens from being mounted or dismounted because of narrow space between the projector and the lens. • Never touch the lens surface while the projector is operating. • Be very careful not to let dirt, grease, etc., on the lens surface and not to scratch the lens surface. • Perform these operations on a flat surface over a piece of cloth, etc., to prevent the lens from getting scratched. • When leaving the lens off the projector for long periods of time, mount the dust cap on the projector to prevent dust or dirt from getting inside. Mounting 1. Remove the dust cap from the projector. Pull on the bottom edge of the dust cap with your fingers. 46
-
 1
1 -
2
-
3
-
4
-
5
-
6
-
7
-
8
-
9
-
10
-
11
-
12
-
13
-
14
-
15
-
16
-
17
-
18
-
19
-
20
-
21
-
22
-
23
-
24
-
25
-
26
-
27
-
28
-
29
-
30
-
31
-
32
-
33
-
34
-
35
-
36
-
37
-
38
-
39
-
40
-
41
-
42
-
43
-
44
-
45
-
46
-
47
-
48
-
49
-
50
-
51
-
52
-
53
-
54
-
55
-
56
-
57
-
58
-
59
-
60
-
61
-
62
-
63
-
64
-
65
-
66
-
67
-
68
-
69
-
70
-
71
-
 72
72 -
 73
73 -
 74
74 -
 75
75 -
 76
76 -
 77
77 -
 78
78 -
 79
79 -
 80
80 -
 81
81 -
 82
82
 |
 |