NEC NP-ME301W Users Manual - Page 109
Connection Example 1 [SMART CONNECTION], Connection Example 2 [SIMPLE ACCESS POINT], WIRELESS LAN]
 |
View all NEC NP-ME301W manuals
Add to My Manuals
Save this manual to your list of manuals |
Page 109 highlights
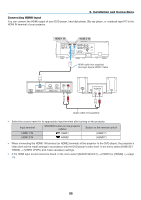
Connection Example (1) [SMART CONNECTION] Easily connect the projector to multiple terminals as computers and smart phones by PIN code. 6. Installation and Connections 1. Download the application software, "MultiPresenter" from our company web site and install it onto each terminal as a computer. http://www.nec-display.com/dl/en/soft/multipresenter/index.html 2. Power ON the projector and display on the on-screen menu and then select as the bellows in order: [SETUP] → [WIRELESS LAN] → [SMART CONNECTION] for [PROFILE] 3. Switch the source of the projector to [LAN]. The stand-by screen will be displayed on. 4. Launch the application software "MultiPresenter" on each terminal and input PIN CODE that is shown on the stand-by screen. * For iOS, select SSID in advance and input the SECURITY KEY. • Perform detail settings for the SMART CONNECTION activating the HTTP Server function. (→ page 40) • About details of the MultiPresenter application, please refer to the manual of MultiPresenter uploaded on our com- pany web site. Connection Example (2) [SIMPLE ACCESS POINT] Set the projector as SIMPLE ACCESS POINT for connecting to terminals as computers and smart phones. 98
-
 1
1 -
2
-
3
-
4
-
5
-
6
-
7
-
8
-
9
-
10
-
11
-
12
-
13
-
14
-
15
-
16
-
17
-
18
-
19
-
20
-
21
-
22
-
23
-
24
-
25
-
26
-
27
-
28
-
29
-
30
-
31
-
32
-
33
-
34
-
35
-
36
-
37
-
38
-
39
-
40
-
41
-
42
-
43
-
44
-
45
-
46
-
47
-
48
-
49
-
50
-
51
-
52
-
53
-
54
-
55
-
56
-
57
-
58
-
59
-
60
-
61
-
62
-
63
-
64
-
65
-
66
-
67
-
68
-
69
-
70
-
71
-
72
-
73
-
74
-
75
-
76
-
77
-
78
-
79
-
80
-
81
-
82
-
83
-
84
-
85
-
86
-
87
-
88
-
89
-
90
-
91
-
92
-
93
-
94
-
95
-
96
-
97
-
98
-
99
-
100
-
101
-
102
-
103
-
 104
104 -
 105
105 -
 106
106 -
 107
107 -
 108
108 -
 109
109 -
 110
110 -
 111
111 -
 112
112 -
 113
113 -
 114
114 -
115
-
116
-
117
-
118
-
119
-
120
-
121
-
122
-
123
-
124
-
125
-
126
-
127
-
128
-
129
-
130
-
131
-
132
-
133
 |
 |
