Miele KF 2981 SF Operating and Installation instructions - Page 27
While holding the anti-tip brackets in, if necessary.
 |
View all Miele KF 2981 SF manuals
Add to My Manuals
Save this manual to your list of manuals |
Page 27 highlights
Building in the appliance 2 Fixing screws for different uses and types of material are supplied in the accompanying pack: 2 2 Make sure that the gap between the appliance's rear wall and the installation niche does not exceed 2" (51 mm). Securing to concrete wall Place a wooden wedge behind the anti-tip brackets if necessary. 2 While holding the anti-tip brackets in place, mark the necessary drill holes on the rear wall of the installation niche. Securing to a wooden wall 27
-
 1
1 -
2
-
3
-
4
-
5
-
6
-
7
-
8
-
9
-
10
-
11
-
12
-
13
-
14
-
15
-
16
-
17
-
18
-
19
-
20
-
21
-
 22
22 -
 23
23 -
 24
24 -
 25
25 -
 26
26 -
 27
27 -
 28
28 -
 29
29 -
 30
30 -
 31
31 -
 32
32 -
33
-
34
-
35
-
36
-
37
-
38
-
39
-
40
-
41
-
42
-
43
-
44
-
45
-
46
-
47
-
48
-
49
-
50
-
51
-
52
-
53
-
54
-
55
-
56
-
57
-
58
-
59
-
60
-
61
-
62
-
63
-
64
-
65
-
66
-
67
-
68
-
69
-
70
-
71
-
72
-
73
-
74
-
75
-
76
-
77
-
78
-
79
-
80
-
81
-
82
-
83
-
84
-
85
-
86
-
87
-
88
-
89
-
90
-
91
-
92
-
93
-
94
-
95
-
96
-
97
-
98
-
99
-
100
-
101
-
102
-
103
-
104
-
105
-
106
-
107
-
108
-
109
-
110
-
111
-
112
-
113
-
114
-
115
-
116
-
117
-
118
-
119
-
120
 |
 |
Building in the appliance
27
2
2
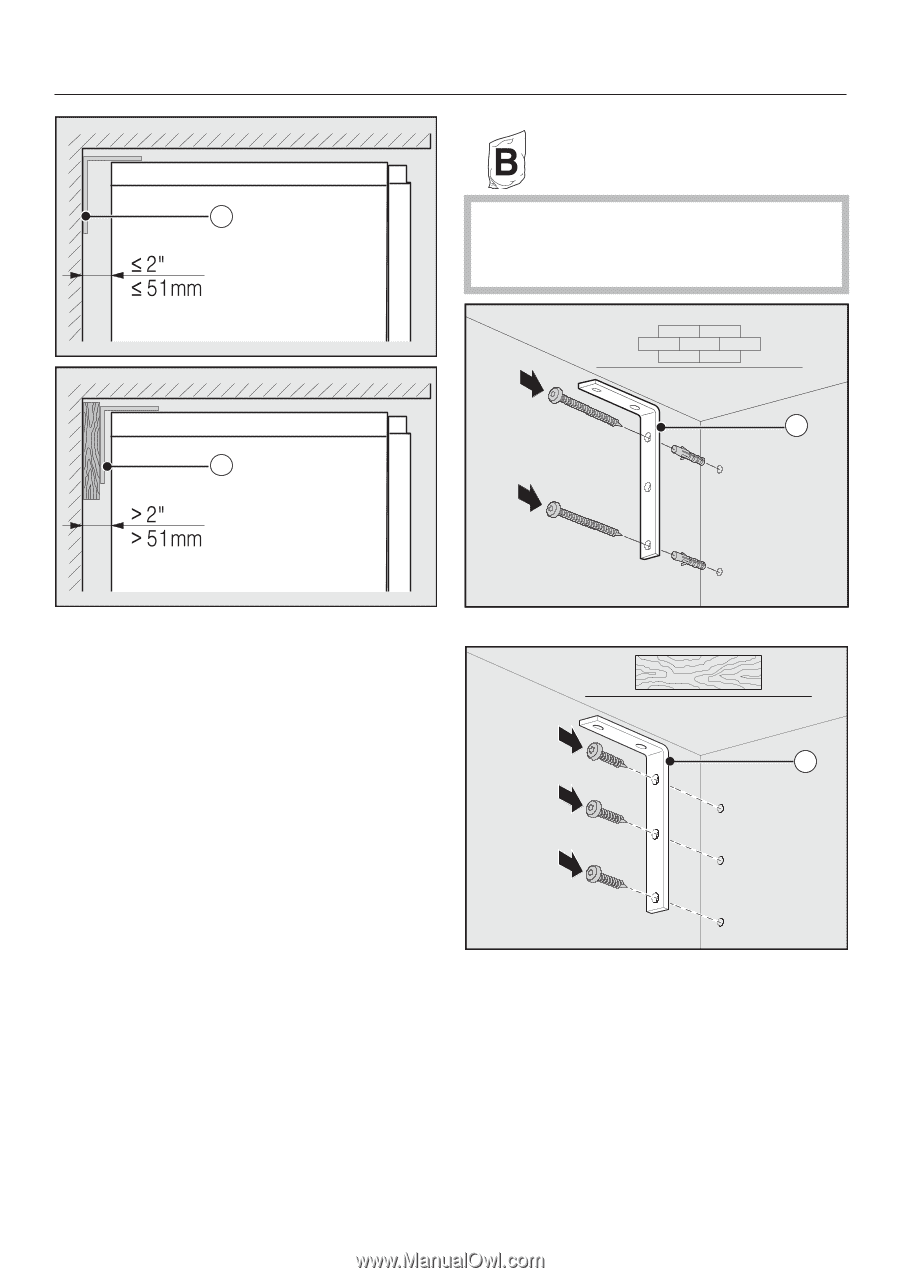
Make sure that the gap between the
appliance's rear wall and the installa-
tion niche does not exceed
2" (51 mm).
Place a wooden wedge behind the
anti-tip brackets
if necessary.
While holding the anti-tip brackets in
place, mark the necessary drill holes
on the rear wall of the installation
niche.
Fixing screws for different uses and
types of material are supplied in the
accompanying pack:
2
Securing to concrete wall
2
Securing to a wooden wall