Meade 14 inch Instruction Manual
Meade 14 inch Manual
 |
View all Meade 14 inch manuals
Add to My Manuals
Save this manual to your list of manuals |
Meade 14 inch manual content summary:
- Meade 14 inch | Instruction Manual - Page 1
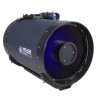
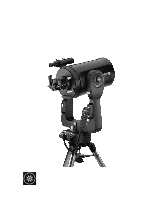
Instruction Manual 8", 10", 12", 14", 16" LX200GPS Schmidt-Cassegrain Telescopes 7" LX200GPS Maksutov-Cassegrain Telescope with Autostar II Hand Controller Meade Instruments Corporation - Meade 14 inch | Instruction Manual - Page 2
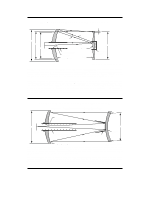
Secondary Mirror Correcting Plate 8.0" Secondary Baffle (8" model depicted in diagram. Not to scale.) In the Schmidt-Cassegrain design of the Meade 8", 10", 12", 14", and 16" LX200GPS models, light enters from the right, passes through a thin lens with 2-sided aspheric correction ("correcting - Meade 14 inch | Instruction Manual - Page 3
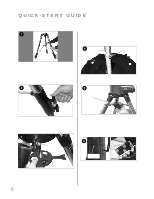
telescope for the first time, read the QUICK-START GUIDE on pages 4 and 5. 16" LX200GPS Users: See APPENDIX F, page 62, for features unique to the 16" model. 14" LX200GPS Users: See APPENDIX G, page 66, for features unique to the 14" model. ® The name "Meade" and the Meade Position Manually 38 One - Meade 14 inch | Instruction Manual - Page 4
GUIDE It is recommended that you attach the supplied tripod to the LX200GPS for observing. Perform the telescope and Autostar II setup indoors in the light so that you become familiar with the parts and operation before moving the telescope its three arms line up with the tripod feet down and with - Meade 14 inch | Instruction Manual - Page 5
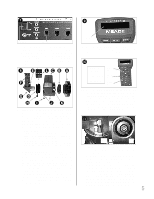
from the packing materials. Plug one end into the HBX port of the telescope's computer control panel and plug the other end into the coil cord port the groove in the microfocuser (I, also see Fig. 7a and 7b, page 14). Slide the 1.25" diagonal prism into the adapter (D). Tighten the adapter thumbscrew - Meade 14 inch | Instruction Manual - Page 6
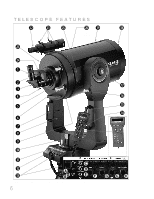
FEATURES 2@ 2! 2% 2) 1( 1* (not shown, on left fork arm) 2# (not shown) 2$ B c 1& d e 1^ f 1% 1$ g h i j 1) 1! Ả 1@ Ạ ả 1# ạ Ấấ Fig. 1: The LX200GPS Telescope; Computer Control Panel (inset); Autostar II Handbox (inset). 6 Autostar II Hand Controller. See page 9. Ầ Ầầ - Meade 14 inch | Instruction Manual - Page 7
rings of the planet Saturn from a distance of 800 million miles. Focus beyond the Solar System on ancient star clusters, remote galaxies, and stars recently discovered to have planets orbiting about them. Meade LX200GPS telescopes fork arm; telescope, prevents the telescope from being rotated manually - Meade 14 inch | Instruction Manual - Page 8
accessories. Your PC can control your LX200GPS telescope using serial commands. Go to the Meade website (www.meade.com) to download the latest serial commands and device pinouts. H. Autoguider Port: Plug the optional autoguider into this port. See the instruction sheet that came with your autoguider - Meade 14 inch | Instruction Manual - Page 9
12,939 28,484 17,191 17,325 s Take a guided tour of the best celestial objects to view on any given night of the year. s Control your LX200GPS with your PC using an RS232 interface. s Align your telescope automatically using GPS (Global Positioning System). s Access a glossary of astronomical - Meade 14 inch | Instruction Manual - Page 10
the alignment or GO TO procedures to activate a "spiral search." f Arrow Keys: The Arrow keys have several functions. Press an Arrow key to slew the telescope in a specific direction (up, down, left, and right), at any one of nine different speeds. See SLEW SPEEDS, page 17. Use the Up and Down - Meade 14 inch | Instruction Manual - Page 11
the Help feature. The Help system is essentially an onscreen instruction manual. If you have a question about an Autostar II operation, the trade" to try out with your LX200GPS telescope. See page 40 for more information about photography with the LX200GPS. Many groups also hold regularly scheduled - Meade 14 inch | Instruction Manual - Page 12
carefully the following parts: s LX200GPS Telescope with fork mount system s Autostar . Stand the tripod vertically with the tripod feet down and with the tripod still fully collapsed ° from its assembled position, so that one spreader bar arm is located between each adjacent pair of tripod legs. - Meade 14 inch | Instruction Manual - Page 13
. (A) Rear cell of telescope (shown separate from the telescope assembly for the sake of clarity, see 5, Fig. 1); (B) Microfocuser adapter; (C) Microfocuser; (D) 1.25" accessory adapter. SC accessory adapter (L) may be used in this position instead if Schmidt-Cassegrain accessories are being used - Meade 14 inch | Instruction Manual - Page 14
: Handbox holder attached to fork arm handle. 14 5. Attach Diagonal (or accessories) .; see page 42) with the LX200GPS SC models, slide the supplied SC telescope's eyepiece magnifies the image formed by the telescope's main optics. Each eyepiece has a focal length, expressed in millimeters, or "mm - Meade 14 inch | Instruction Manual - Page 15
of magnification ratings of the eyepieces available for the LX200GPS telescopes, see OPTIONAL ACCESSORIES, page 41. Mounting and Adjusting to "overpower" a telescope by using high magnifications which the telescope's aperture and atmospheric conditions cannot reasonably support. Keep in mind that - Meade 14 inch | Instruction Manual - Page 16
? See Slew Speeds, this page. OBSERVING Observing by Moving the Telescope Manually If you wish to observe a distant land object, such as page 20). Terrestrial Observing The LX200GPS models are excellent high-resolution terrestrial (land) telescopes. Viewing terrestrial objects requires looking - Meade 14 inch | Instruction Manual - Page 17
the telescope during CCD and long-exposure photography. See GUIDING RATE, page 29, for more information. 9. Bring the object into focus (see below). Focusing the Eyepiece Using the Microfocuser The LX200GPS zero image-shift microfocuser (24, Fig. 1) allows you to obtain the most precise image - Meade 14 inch | Instruction Manual - Page 18
II then displays "Enter Date." You may follow prompts to perform a manual alt/az alignment (see page 37) or press MODE repeatedly until "Select to move through its menus. You'll need to initialize and align your telescope. Moving Through Autostar II's Menus The Autostar II database is organized in - Meade 14 inch | Instruction Manual - Page 19
Fix." The LX200's GPS receiver attempts to acquire and sync up with signals from GPS satellites. "Getting GPS Fix" displays. See THE GLOBAL POSITIONING SYSTEM in the LX200GPS INFO box on page 21. After performing these operations, Autostar II now knows: s The telescope's limiting positions s Where - Meade 14 inch | Instruction Manual - Page 20
automatic tracking procedure, only use the Arrow keys to move the telescope. Once the telescope has been aligned, do not loosen the telescope locks (12 and 17, Fig. 1), or move the base manually, or alignment will be lost. Tip: To manually enter the R.A. and Dec. coordinates of an object: Press and - Meade 14 inch | Instruction Manual - Page 21
custom Guided Tour. See CREATE YOUR OWN GUIDED TOUR, page 56. GPS Receiver Fig. 14: LX200GPS GPS Receiver. LX200GPS INFO feet.) As Autostar II uses latitude, longitude, and time information to calculate the positions of celestial objects, GPS is an ideal tool for aligning your LX200GPS telescope - Meade 14 inch | Instruction Manual - Page 22
Object Event Guided Tours Glossary Utilities Setup Fig. 16: Menus set in a loop. Setup Align Date Time Daylight Saving Telescope Targets etc. galaxy? Select from over 145,000 objects and press GO TO to move the telescope automatically to an object. Select Item: Event EVENT MENU Display the time of - Meade 14 inch | Instruction Manual - Page 23
through the options or lists. s Press the Arrow keys to move the cursor across the display. s Press the Help (?) key to access on-line help. LX200GPS TIPS Look into the Future The Autostar II Date option in the Setup menu is much more than just an entry of today's date; with - Meade 14 inch | Instruction Manual - Page 24
Smart Mount Configuration Off On Train Update Load Save As Delete Erase Telescope Mount Model Focal Length Max Slew Rate Mount Upper Limit Mount Position Calibrate Home Anti-Backlash Train Drive Calibrate Sensors Tracking Rate Guiding Rate Reverse L/R Reverse Up/Dn Home Sensors GPS Alignment R.A. - Meade 14 inch | Instruction Manual - Page 25
II is performed using the Object menu category. (Note: Exceptions include Guided Tour and Landmark Survey.) See GO TO SATURN, page 20, for an example brightest star in the constellation. Press GO TO a second time to slew the telescope to that star. Use the Scroll keys to cycle through the list of stars - Meade 14 inch | Instruction Manual - Page 26
an observer's meridian, i.e., the time when an object is at its highest point in the sky on any given date. 26 WARNING! Never use your Meade® LX200GPS Telescope to look at the Sun! Looking at or near the Sun will cause instant and irreversible damage to your eye. Eye damage is often painless - Meade 14 inch | Instruction Manual - Page 27
the alarm time arrives, Autostar II beeps. Press ENTER to deactivate the alarm. Eyepiece Calc: Calculates information about an eyepiece for the specific telescope to which Autostar II is connected. s Field of View: Scroll through a list of available eyepieces. When an eyepiece is selected, the field - Meade 14 inch | Instruction Manual - Page 28
Menu The Setup menu's primary function is used for manual telescope alignment (see MANUAL ALT/AZ ALIGNMENTS, pages 37 and 38). However, tube can swing upward during a programmed slew. LX200GPS TIPS Timing is Everything Your telescope receives the precise time when it synchs with the GPS. - Meade 14 inch | Instruction Manual - Page 29
999, the telescope will be moving at approximately twice the tracking rate. (Note that it does not prevent you from performing a manual slew past this observing sessions. c. Custom: Allows entry of user-defined tracking rates. s Guiding Rate: Allows you to change the base slew speed, 1x. Enter a - Meade 14 inch | Instruction Manual - Page 30
or on the True North and True Level sensors, if preferred, for Easy, One-Star, and Two-Star alignment. User must then manually level the telescope and point the telescope to True North during alignment. Default setting is "On." s GPS Alignment: Allows three options. Select "Off" if you wish to align - Meade 14 inch | Instruction Manual - Page 31
LX200 Interface Cable. See the instruction sheet included with the cable for more information on how to download. Also see OPTIONAL ACCESSORIES, page 43. Important Note: If your download fails in the middle of the download attempt (e.g., your PC crashes), turn off the telescope. Turn the telescope - Meade 14 inch | Instruction Manual - Page 32
yourself with the basic operations of Autostar II described earlier in this manual. The following examples assume that you have a basic knowledge of and text. It also assumes that you have initialized and aligned your telescope. Adding Observing Sites If you plan to observe using Autostar II at - Meade 14 inch | Instruction Manual - Page 33
that allows you to enter an object's R.A and Dec. coordinates in the "User: Objects" option of the Object menu and allows automatic slewing of the telescope to the user-entered coordinates. In order to use this menu option, you first need to look up the R.A and Dec. coordinates of the object - Meade 14 inch | Instruction Manual - Page 34
meade.com) approximately once a month to get updated information and instructions on how to download this data to Autostar II. If orbital parameters are more than one month old, the satellite pass may not happen at the time predicted by Autostar II. Downloading requires the optional LX200 telescope - Meade 14 inch | Instruction Manual - Page 35
add to the database. When finished, press ENTER. 8. "Center Landmark. Press Enter" displays. Using only the Arrow keys (do not manually move the telescope), move the telescope to the desired landmark and center the object in the eyepiece. Press ENTER. The object is now stored in memory. 9. "Landmark - Meade 14 inch | Instruction Manual - Page 36
object or the nearest object to it in the Autostar II database. 1. Center the object you wish to have identified in the telescope's eyepiece. 2. Navigate to the "Object: Identify" option and press ENTER. 3. "Searching..." displays. When Autostar II finishes calculating, the name of the closest - Meade 14 inch | Instruction Manual - Page 37
mounting. During the One-Star and Two-Star alt/az alignment procedures, you will (unlike the Automatic and Easy alignment procedures) manually place the telescope in the home position. The procedures for equatorial (polar) alignment are discussed in APPENDIX A, page 50; the three alternative alt/az - Meade 14 inch | Instruction Manual - Page 38
the telescope in the home position. To Set the Home Position Manually: a. See Figs. 19 and 20, page 37. Loosen the telescope's alignment. LX200GPS TIPS Mirror, Mirror... The LX200GPS telescopes provide features MICROFOCUSER, page 17, for more detailed instructions): 1. Set the "travel" (extension) - Meade 14 inch | Instruction Manual - Page 39
reticle. Use the Arrow keys to keep the star centered in the reticle cross-hairs. Autostar II displays a count of the 200 positions of the worm gear. When update your original training two or three times when first using your telescope. Update does not overwrite the data, but updates the training - Meade 14 inch | Instruction Manual - Page 40
jeweler's screwdriver to slightly loosen three adjustment screws around the outer knurled ring of the T-Mount. Rotate the camera body to achieve proper orientation A few tips on photography with the LX200GPS telescopes: 1. Use the Field Tripod for the telescope. At an effective focal length of 2000mm - Meade 14 inch | Instruction Manual - Page 41
Eyepieces. OPTIONAL ACCESSORIES A wide assortment of professional Meade accessories is available for the LX200GPS telescope models. The premium quality of these accessories is well-suited to the quality of the instrument itself. Consult the Meade General Catalog for complete details on these and - Meade 14 inch | Instruction Manual - Page 42
may also be employed with any LX200GPS-Series telescope. Series 4000 Photo-Visual Color Filters which greatly facilitate locking onto the guide star: Turn the finely-threaded controls through all Meade Schmidt-Cassegrain models. Thread the T-Adapter on to the rear cell of your telescope, followed by - Meade 14 inch | Instruction Manual - Page 43
own 35mm-to-250mm lens, atop your LX200GPS in equatorial mode, and guiding the camera through the main telescope, wide-field photos of the Milky Way telescope. #608 for Meade 7" Maksutov and 8" Schmidt-Cassegrain models; #610 for all 10" Schmidt-Cassegrain models; #612 for all 12" Schmidt-Cassegrain - Meade 14 inch | Instruction Manual - Page 44
telescope used for serious purposes is important, but in the case of the Schmidt-Cassegrain design of the 8", 10", and 12" LX200GPS models LX200GPS will give you the best optical performance. As part of final optical testing, every Meade Schmidt-Cassegrain is precisely collimated at the Meade - Meade 14 inch | Instruction Manual - Page 45
system: a. The only adjustments possible, or necessary, on the Schmidt-Cassegrain LX200GPS models are from the three screws (Fig. 31b) located at support until you see the shadow of the finger crossing the thinnest part of the ring of light. At this point, look at the front of the telescope - Meade 14 inch | Instruction Manual - Page 46
as an "Airy disc") with a diffraction ring surrounding it. To give a final precision LX200GPS requires factory servicing or repairs, write or call the Meade Customer Service Department first, before returning the telescope to the factory, giving full particulars as to the nature of the problem - Meade 14 inch | Instruction Manual - Page 47
accessory box) is plugged into the fan unit of the telescope and the12v DC OUT (13E, Fig. 1) of the computer LX200GPS Specifications Optical design Schmidt-Cassegrain Clear aperture 203mm (8") Focal length 2000mm Focal ratio (photographic speed f/10 Resolving power 0.56 arc sec Coatings Meade - Meade 14 inch | Instruction Manual - Page 48
-level electronic sensor Net telescope weight 73 lbs. Net tripod weight 50 lbs. 14" f/10 LX200GPS Specifications Optical design Schmidt-Cassegrain Clear aperture 356mm (14") Focal length 3556mm Focal ratio (photographic speed f/10 Resolving power 0.321 arc sec Coatings Meade EMC Super Multi - Meade 14 inch | Instruction Manual - Page 49
level electronic sensor Net telescope weight 110 lbs. Net tripod weight 50 lbs. 16" f/10 LX200GPS Specifications Optical design Schmidt-Cassegrain Clear aperture 406.4mm (16") Focal length 4064mm Focal ratio (photographic speed f/10 Resolving power 0.28 arc sec Coatings Meade EMC Super Multi - Meade 14 inch | Instruction Manual - Page 50
telescope, it is essential to have an understanding of how and where to locate celestial objects as they move across the sky. This section provides a basic introduction to the terminology of equatorial-aligned astronomy, and includes instructions the Ring Nebula with the LX200GPS models permit the - Meade 14 inch | Instruction Manual - Page 51
you to take longer exposure photographs with your LX200GPS. See the instruction sheet supplied with the wedge for installation and setup information. Note: For almost all astronomical observing requirements, approximate settings of the telescope's latitude and polar axis are acceptable. Do not - Meade 14 inch | Instruction Manual - Page 52
to set the fork arms to 00 H.A. position. telescope about one axis, the polar axis. This tracking may be accomplished automatically with the LX200GPS electric motor drive. If the telescope instruction sheet included with your equatorial wedge for information about attaching the wedge to the telescope - Meade 14 inch | Instruction Manual - Page 53
manual setting circles, the R.A. setting circle (Fig. 36) must be calibrated manually on the Right Ascension of a star every time the telescope essential. Even though the LX200GPS telescopes offers a very precise and use of a crosshair eyepiece. The Meade Illuminated Reticle Eyepiece (see OPTIONAL - Meade 14 inch | Instruction Manual - Page 54
: Telescope" menu. Autostar II Polar Alignment Autostar II provides three different (manual) Telescope: Mount" menu. The rest of the procedure is almost identical to the (Alt/Az) TWO STAR ALT/AZ ALIGNMENT, page 37. 54 LX200GPS , variable stars, etc. Check Meade's website for the latest product - Meade 14 inch | Instruction Manual - Page 55
APPENDIX B: LATITUDE CHART Latitude Chart for Major Cities of the World To aid in the polar alignment procedure (see page 52), latitudes of major cities around the world are listed below. To determine the latitude of an observing site not listed on the chart, locate the city closest to your site. - Meade 14 inch | Instruction Manual - Page 56
Meade's website (www.meade.com) for future additions. When a Guided Tour is selected, Autostar II slews your telescope "MS-DOS text" file). s The optional Meade LX200 Interface Cable to download tour information to the of an object in the following format: HH:MM:SS. Eg., 18:51:05 Dec.: Enter the - Meade 14 inch | Instruction Manual - Page 57
be the first keyword in your tour after any comment lines and must be 15 characters or less. Autostar II displays this title when "Guided Tour" is selected from the menus. For example: TITLE "A Star's Life" TEXT "title string" "description string" This command allows you to display a text title - Meade 14 inch | Instruction Manual - Page 58
PLANET "name" Enter PLANET and then the name of the desired planet in quotes. Autostar II provides the user with a description of the selected planet from its database. For example: PLANET "Pluto" MOON This command accesses information about the Moon from the Autostar II database. SATELLITE "name" - Meade 14 inch | Instruction Manual - Page 59
in the tour, Autostar II automatically slews the telescope to objects first before displaying the text description. to in a tour. The students would have to manually slew to the last two objects. He would then again. See the instruction sheet with your LX200 Interface Cable for more information about - Meade 14 inch | Instruction Manual - Page 60
problems. Fig. 41 depicts the complete Drive Training procedure. Note: Use a terrestrial object, such as a telephone pole or lamp post, to train the drive. Complete this exer- cise once every 3 to 6 months to maintain the highest level of telescope pointing accuracy. LX200GPS Train 14 Menu manual - Meade 14 inch | Instruction Manual - Page 61
't be able to see details such as any of the lunar landers or lunar excursion modules left behind by the astronauts (the best earth-based telescopes can only resolve features of about a half-mile across), you'll be able pinpoint the landing sites and study the terrain surrounding these sites. When - Meade 14 inch | Instruction Manual - Page 62
14" and the 16" LX200GPS LX200GPS Computer Control Panel. 16" LX200GPS Unique Features The 16" LX200GPS contains, for the most part, the same features (covered earlier in this manual) as all other LX200GPS telescope the OTA while the drive gears may result from shock in handling. During transport or - Meade 14 inch | Instruction Manual - Page 63
shock to the gears in the motor assemblies should the package suffer rough handling. Commercial shipment of the 16" LX200GPS telescope Meade 16" LX200GPS telescope instructions on using the telescope in equatorial mode). The equatorial mode permits alignment of the telescope the three arms align with - Meade 14 inch | Instruction Manual - Page 64
- tion, so that one spreader bar arm is located between each adjacent pair of tripod telescope until the bolt is removed. The bolt is located near the DB-15 assembly in the base as a reminder to unplug the connector before removing the fork from the drive base. Mounting the Optical Tube Assembly (OTA - Meade 14 inch | Instruction Manual - Page 65
slide the OTA back so that the shoulder bolts lock into the slots. c. Lock the OTA in place with the 16" LX200GPS. These should all be attached before powering up the telescope. a. Confirm that the Dec. motor to the fork arms. LX200GPS TIPS Observing Considerations • Try to pick rings of Saturn. 65 - Meade 14 inch | Instruction Manual - Page 66
the same features (covered earlier in this manual) as all other LX200GPS telescope models. The following features are unique to the 14" model: Battery Compartment The battery compartments for the 14" LX200GPS are located under the horizontal beam of the fork arms (Fig. 55a). Each compartment has an - Meade 14 inch | Instruction Manual - Page 67
desk or a table) before you attach the derotater and microfocuser to the telescope. 1. With the de-rotater on a flat surface, thread on the adapter ring (B, Fig. 6) until it just touches the housing; then back off the adapter ring (i.e., turn it counter-clockwise) one full revolution as shown in Fig - Meade 14 inch | Instruction Manual - Page 68
Mount Introduction Smart Mount improves the pointing accuracy of your LX200GPS telescope's "Go to" system. Despite careful efforts to calibrate and align telescopes, they may fail to precisely center objects. Smart Mount allows your telescope to learn about, and then correct for, any systematic - Meade 14 inch | Instruction Manual - Page 69
a model from memory (see SAVE AS AND LOAD above) and then Select Smart On. When Smart Mount is "On," the telescope will use the currently loaded model to refine you telescope's pointing, but will not update the model (see SMART MOUNT UPDATE above). If Smart Mount was "On" when you last powered - Meade 14 inch | Instruction Manual - Page 70
birth to modern astronomy. Yet Galileo's telescope was so crude, he could not clearly make out the rings of Saturn. Galileo's discoveries laid the astronomers. So as you look through your Meade LX200GPS telescope, keep in mind Galileo. To him, a telescope was not merely a machine made of glass - Meade 14 inch | Instruction Manual - Page 71
: The Pleiades is one of the most beautiful open clusters. Fig. 66: The Andromeda Galaxy monthly astronomy magazine, such as Sky and Telescope or Astronomy. You can also consult Autostar division in Saturn's rings, called the Cassini Division, is occasionally visible through the LX200GPS. Titan, the - Meade 14 inch | Instruction Manual - Page 72
Meade will repair or replace a product, or part thereof, found by Meade to be defective, provided the defective part is returned to Meade must be obtained from Meade by writing, or calling tear. Meade specifically Meade Instruments Corporation World's Leading Manufacturer of Astronomical Telescopes
-
 1
1 -
 2
2 -
 3
3 -
 4
4 -
 5
5 -
 6
6 -
 7
7 -
8
-
9
-
10
-
11
-
12
-
13
-
14
-
15
-
16
-
17
-
18
-
19
-
20
-
21
-
22
-
23
-
24
-
25
-
26
-
27
-
28
-
29
-
30
-
31
-
32
-
33
-
34
-
35
-
36
-
37
-
38
-
39
-
40
-
41
-
42
-
43
-
44
-
45
-
46
-
47
-
48
-
49
-
50
-
51
-
52
-
53
-
54
-
55
-
56
-
57
-
58
-
59
-
60
-
61
-
62
-
63
-
64
-
65
-
66
-
67
-
68
-
69
-
70
-
71
-
72
 |
 |

Instruction Manual
8", 10", 12", 14", 16" LX200GPS Schmidt-Cassegrain Telescopes
7" LX200GPS Maksutov-Cassegrain Telescope
with Autostar II Hand Controller
Meade Instruments Corporation