Marantz PM5003 PM5003 User Manual - English - Page 7
Inames And Functions - stereo integrated amplifier
 |
View all Marantz PM5003 manuals
Add to My Manuals
Save this manual to your list of manuals |
Page 7 highlights
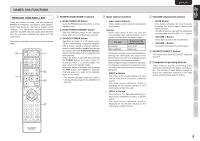
NAMES AND FUNCTIONS BASIC CONNECTIONS BASIC OPERATION ADVANCED CONNECTION ENGLISH NAMES AND FUNCTIONS FRONT PANEL qw e rt y u STANDBY POWER ON/OFF INPUT SELECTOR PHONES PHONO INTEGRATED AMPLIFIER PM5003 TUNER CD AUX/DVD 1 RECORDER 2 MUTE SOURCE DIRECT A SPEAKERS B LOUDNESS BASS TREBLE BALANCE L R VOLUME MIN MAX o BALANCE CONTROL Turn the knob to correct an unbalanced program source such as stereo broadcast or to vary the output level of the left or right channel. Note that, if the BALANCE control is turned fully in one direction, the sound will not be heard from the speaker on the other side. !0 LOUDNESS button and indicator This button turns LOUDNESS ON and OFF. When LOUDNESS is ON, the center of the button is lit. The LOUDNESS cmpensates for human hearing characteristics by boosting the bass and treble response at low volume levels to achieve a more pleasing tonal balance. !3 q POWER SWITCH Pressing once switches the power ON, and pressing again switches it OFF. If the POWER switch is in the ON position, the power of this unit can be turned ON/OFF by pressing the POWER button on the remote controller. w STANDBY INDICATOR Lights up when the unit is in the standby mode. e INPUT SELECTOR Selects the program source to be recorded or played from the PHONO, TUNER, CD, AUX/ DVD, RECORDER 1 (CD-R), and RECORDER 2 (MD/TAPE). !2 !1 !0 o i r SOURCE DIRECT button and indicator This button turns SOURCE DIRECT mode ON and OFF. When SOURCE DIRECT is ON, the center of the button is lit. In the Source Direct mode, the audio signals bypass the tone control circuit. t FUNCTION INDICATORS One of the indicators lights up to indicate the input source selected with the INPUT SELECTOR. y MUTE INDICATOR Light up when the MUTE button in the remote controller is pressed. NOTE: Be sure to check the VOLUME control setting before pressing this switch to cancel muting. If the muting is canceled while the volume setting is high, the speakers could be damaged. u VOLUME CONTROL Adjusts the volume level. Turn the knob clockwise to increase the volume. i REMOTE SENSOR The remote sensor receives the infrared commands from the remote controller. When an infrared signal is received from the remote controller. The remote controller must always be pointed directly at the remote sensor. !1 SPEAKERS A/B buttons and indicators These buttons turn the speaker output to the speakers connected to the SPEAKER SYSTEMS A/B terminals on the rear panel ON and OFF. When speaker output is ON, the center of the button is lit. To listen with headphones, turn speaker output OFF. !2 BASS AND TREBLE TONE CONTROLS Adjusts the tone by controlling the levels of two frequency bands. Turn each control toward (+) to enhance the corresponding frequency band, or toward (-) to attenuate it. TREBLE: Adjusts the high frequency level. BASS: Adjusts the low frequency level. !3 PHONES JACK Insert the standard phone plug of the headphones into this jack. REMOTE CONTROLLER OPERATION TROUBLESHOOTING OTHERS 4
-
 1
1 -
 2
2 -
 3
3 -
 4
4 -
 5
5 -
 6
6 -
 7
7 -
 8
8 -
 9
9 -
 10
10 -
 11
11 -
 12
12 -
13
-
14
-
15
-
16
-
17
-
18
 |
 |
