LiftMaster SL585151U SL585151U Installation Manual - Page 43
Diagnostics Display, Open, Close, & Stop Buttons, To View The Codes
 |
View all LiftMaster SL585151U manuals
Add to My Manuals
Save this manual to your list of manuals |
Page 43 highlights
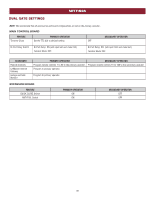
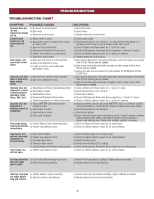
TROUBLESHOOTING To protect against fire and electrocution: • DISCONNECT power (AC or solar and battery) BEFORE installing or servicing operator. For continued protection against fire: • Replace ONLY with fuse of same type and rating. DIAGNOSTIC CODES TO VIEW THE CODES The codes will show on the diagnostic display. Press and hold the STOP button... ...then press and hold the CLOSE button... ...then press and hold the OPEN button until "Er" shows on the display. OPEN, CLOSE, & STOP BUTTONS DIAGNOSTICS DISPLAY BIPART DELAY 4 2 6 OPEN LEFT OPEN 8 RIGHT HANDING COMM LINK BA The operator will show the code sequence number followed by the code number: CODE SEQUENCE NUMBER The first number shown is the most recent code (example: "01"). The display will show the sequence of codes that occurred starting with "01" and going up to code "20". A SECOND LATER.... CODE NUMBER The second number shown after the code sequence number is the code itself (31-99, example" "31"). Refer to the chart on the following page for an explanation of each code. ANTENNA CURRENT MOTOR DRIVE SENSOR ID RESET RPM & LIMITS ALARM EXP. BOARD 24 VAC IN GND CLASS 2 SUPPLY 24 VAC 500 mA MAX TO EXIT Press and release the STOP button to exit. The display will also time out after two minutes of inactivity. TO SCROLL THROUGH THE SAVED CODES Press the OPEN button to cycle to the most recent code ("01"). Press the CLOSE button to cycle to the oldest code (up to "20"). TO RESET THE CODE HISTORY 1. Press and hold the STOP button for six seconds. The display will show "Er" then "CL" alternately for six seconds. 2. Release the STOP button. The code history has now been reset and the display will show "- -" until a new code occurs. 3. Press and release the STOP button to exit. The operator will only keep track of up to 20 codes, then will start saving over the oldest codes as new codes occur. 41
-
 1
1 -
2
-
3
-
4
-
5
-
6
-
7
-
8
-
9
-
10
-
11
-
12
-
13
-
14
-
15
-
16
-
17
-
18
-
19
-
20
-
21
-
22
-
23
-
24
-
25
-
26
-
27
-
28
-
29
-
30
-
31
-
32
-
33
-
34
-
35
-
36
-
37
-
 38
38 -
 39
39 -
 40
40 -
 41
41 -
 42
42 -
 43
43 -
 44
44 -
 45
45 -
 46
46 -
 47
47 -
 48
48 -
49
-
50
-
51
-
52
 |
 |
