LiftMaster RSW12U RSW12U Compact Installation Manual - Page 3
Step 2
 |
View all LiftMaster RSW12U manuals
Add to My Manuals
Save this manual to your list of manuals |
Page 3 highlights
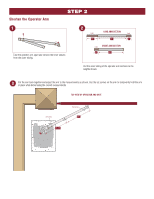
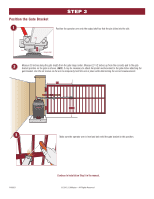
Shorten the Operator Arm STEP 2 1 Take the operator arm apart and remove the inner sleeves from the outer tubing. 2 (cut) 10" LONG ARM SECTION (cut) 22" 4" (cut) SHORT ARM SECTION 4" 20" Cut the outer tubing of the operator arm sections to the lengths shown. 3 Put the arm back together and adjust the arm to the measurements as shown. Use the set screws on the arm to temporarily hold the arm in place while determining the correct measurements. TOP VIEW OF OPERATOR AND GATE Set screw 25-1/2" Set screw 23"
-
 1
1 -
 2
2 -
 3
3 -
 4
4 -
 5
5 -
 6
6 -
 7
7 -
 8
8 -
 9
9 -
10
-
11
-
12
 |
 |

1
2
3
Put the arm back together and adjust the arm to the measurements as shown. Use the set screws on the arm to temporarily hold the arm
in place while determining the correct measurements.
Shorten the Operator Arm
STEP 2
Take the operator arm apart and remove the inner sleeves
from the outer tubing.
Cut the outer tubing of the operator arm sections to the
lengths shown.
TOP VIEW OF OPERATOR AND GATE
(cut)
LONG ARM SECTION
(cut)
(cut)
SHORT ARM SECTION
Set screw
Set screw
25-1/2"
23"
10"
22"
4"
4"
20"