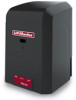
LiftMaster RSL12U RSL12U Quick Start Guide Manual
LiftMaster RSL12U Manual
 |
View all LiftMaster RSL12U manuals
Add to My Manuals
Save this manual to your list of manuals |
LiftMaster RSL12U manual content summary:
- LiftMaster RSL12U | RSL12U Quick Start Guide Manual - Page 1
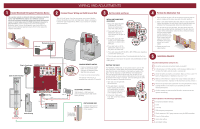
ensure that the total gate system is installed and operated properly. Refer to the installation manual for complete information regarding installation, testing, and programming. 01-38138 845 Larch Avenue Elmhurst, Illinois 60126-1196 LiftMaster.com © 2016, LiftMaster - All Rights Reserved 6" (15 - LiftMaster RSL12U | RSL12U Quick Start Guide Manual - Page 2
and will result in a service call. Check the battery and battery connections. Make sure there is one 12V battery. Replace battery if depleted to less than 11.5 V. Make sure the antenna is in place when using wireless dual gates or on-board transmitters. Operator will be intermittent at times without - LiftMaster RSL12U | RSL12U Quick Start Guide Manual - Page 3
te concernant l'installation, la mise à l'essai et la programmation. 01-38138 845 Larch Avenue Elmhurst, Illinois 60126-1196 LiftMaster.com © 2016, LiftMaster - Tous droits réservés Raccorder la chaîne au support de 8 barrière avant. 15,2 cm (6 po) au-dessus du sol Sous la ligne de gel. Vérifier - LiftMaster RSL12U | RSL12U Quick Start Guide Manual - Page 4
de LiftMaster contre pour les instructions complètes OPEN selon la limite qui est en cours de réglage. 4. Enfoncer et tenir un des boutons MOVE GATE peuvent supporter les service. Vérifier la batterie et les connexions de la batterie. Vérifier qu'il y a une batterie de 12 V. Remplacer la batterie - LiftMaster RSL12U | RSL12U Quick Start Guide Manual - Page 5
Modelo RSL12U 61 cm ( es responsabilidad del usuario y del instalador. En el manual de instalación se encontrará la información completa sobre ón. 01-38138 845 Larch Avenue Elmhurst, Illinois 60126-1196 LiftMaster.com © 2016, LiftMaster - Reservados todos los derechos de ley Colocar la cadena en - LiftMaster RSL12U | RSL12U Quick Start Guide Manual - Page 6
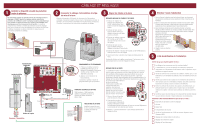
externa monitoreada de LiftMaster para CADA ón opcional). Consultar el manual para obtener la información de 30 segundos. 10W 12V PANEL SOLAR (OPCIONAL) 10 Vatios mínimo - 30 GATE (mover el portón) para mover el portón hasta el límite de apertura o de cierre. 3. Pulsar y soltar el botón SET OPEN
-
 1
1 -
 2
2 -
 3
3 -
 4
4 -
 5
5 -
 6
6
 |
 |

2
3
1
8
6
7
4
5
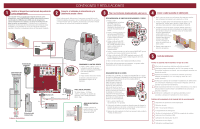
This QuickStart is intended to highlight a single gate
application. Each application is unique and it is the
responsibility of the purchaser, installer and end user to ensure
that the total gate system is installed and operated properly.
Refer to the installation manual for complete information
regarding installation, testing, and programming.
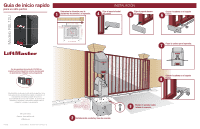
QuickStart
for single gate application
Model RSL12U
INSTALLATION
01-38138
© 2016, LiftMaster – All Rights Reserved
845 Larch Avenue
Elmhurst, Illinois 60126-1196
LiftMaster.com
2016 UL 325 Gate Operators require use of LiftMaster
external monitored entrapment protection devices.
1" - 2" (2.5 - 5.1 cm)
1/2"
(1.8 cm)
24" (61 cm)
24" (61 cm)
(conduit
location)
Determine location for concrete pad.
Attach the rear gate bracket.
Attach the chain to the rear gate
bracket.
Route the chain through the
operator.
Install conduit and pour concrete pad.
Attach the operator to
the concrete pad.
Attach the front gate bracket.
Attach the chain to the front gate
bracket.
6" (15.2 cm) Above Ground
Below the frost line. Check
all national and local codes.
Minimum of 24" (61 cm)
recommended in regions
with no frost line.