Lexmark B2236 Quick Reference - Page 5
Paper jam in the rear door, Paper jam in the duplex unit
 |
View all Lexmark B2236 manuals
Add to My Manuals
Save this manual to your list of manuals |
Page 5 highlights
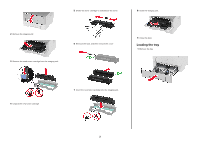
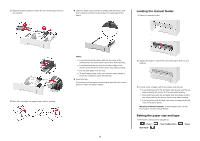
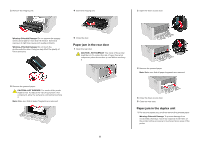
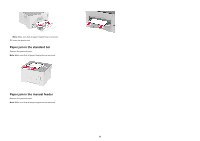
2 Remove the imaging unit. 4 Insert the imaging unit. 2 Open the fuser access door. Warning-Potential Damage: Do not expose the imaging unit to direct light for more than 10 minutes. Extended exposure to light may cause print quality problems. Warning-Potential Damage: Do not touch the photoconductor drum. Doing so may affect the quality of future print jobs. 5 Close the door. Paper jam in the rear door 1 Open the rear door. CAUTION-HOT SURFACE: The inside of the printer might be hot. To reduce the risk of injury from a hot component, allow the surface to cool before touching it. 3 Remove the jammed paper. Note: Make sure that all paper fragments are removed. 3 Remove the jammed paper. CAUTION-HOT SURFACE: The inside of the printer might be hot. To reduce the risk of injury from a hot component, allow the surface to cool before touching it. Note: Make sure that all paper fragments are removed. 4 Close the fuser access door. 5 Close the rear door. Paper jam in the duplex unit 1 Pull out the duplex unit, and then remove the jammed paper. Warning-Potential Damage: To prevent damage from electrostatic discharge, touch any exposed metal frame of the printer before accessing or touching interior areas of the printer. 5
-
 1
1 -
 2
2 -
 3
3 -
 4
4 -
 5
5 -
 6
6
 |
 |
