Kyocera FS-9130DN FS-9130DN/9530DN Operation Guide (Advanced) Rev-1.1 - Page 118
Received Data Dumping, Printer Resetting, Others, >Print HEX-DUMP, Processing, Waiting
 |
View all Kyocera FS-9130DN manuals
Add to My Manuals
Save this manual to your list of manuals |
Page 118 highlights
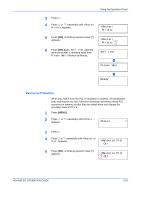
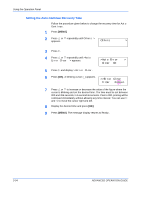
Using the Operation Panel Received Data Dumping It is possible to print data received by the printer as hexadecimal code for the purposes of debugging programs and files. 1 Press [MENU]. 2 Press U or V repeatedly until Others > appears. Others > 3 Press Z. 4 Press U or V repeatedly until >Print HEX-DUMP appears. >Print HEX-DUMP 5 Press [OK]. A blinking question mark (?) appears. >Print HEX-DUMP? 6 Press [OK] again. Processing appears for a second, and then Waiting appears. Processing Waiting 7 Send data to be dumped to the printer. The message Processing will be displayed while receiving the data. Once the dumped data you require has been printed, it is possible to cancel the printing of any further dumped data by taking the printer offline by pressing [GO] and then pressing [CANCEL]. 8 Once all data has been received, the message Waiting will appear. Press [GO] to finish printing. Printer Resetting The procedure described below resets the printer's temporary conditions, such as the current unit of measurement, page orientation, font, character code set, margins, etc., set by commands to their default values. 1 Press [MENU]. 2 Press U or V repeatedly until Others > appears. Others > 2-90 ADVANCED OPERATION GUIDE
-
 1
1 -
2
-
3
-
4
-
5
-
6
-
7
-
8
-
9
-
10
-
11
-
12
-
13
-
14
-
15
-
16
-
17
-
18
-
19
-
20
-
21
-
22
-
23
-
24
-
25
-
26
-
27
-
28
-
29
-
30
-
31
-
32
-
33
-
34
-
35
-
36
-
37
-
38
-
39
-
40
-
41
-
42
-
43
-
44
-
45
-
46
-
47
-
48
-
49
-
50
-
51
-
52
-
53
-
54
-
55
-
56
-
57
-
58
-
59
-
60
-
61
-
62
-
63
-
64
-
65
-
66
-
67
-
68
-
69
-
70
-
71
-
72
-
73
-
74
-
75
-
76
-
77
-
78
-
79
-
80
-
81
-
82
-
83
-
84
-
85
-
86
-
87
-
88
-
89
-
90
-
91
-
92
-
93
-
94
-
95
-
96
-
97
-
98
-
99
-
100
-
101
-
102
-
103
-
104
-
105
-
106
-
107
-
108
-
109
-
110
-
111
-
112
-
 113
113 -
 114
114 -
 115
115 -
 116
116 -
 117
117 -
 118
118 -
 119
119 -
 120
120 -
 121
121 -
 122
122 -
 123
123 -
124
-
125
-
126
-
127
-
128
-
129
-
130
-
131
-
132
-
133
-
134
-
135
-
136
-
137
-
138
-
139
-
140
-
141
-
142
-
143
-
144
-
145
-
146
-
147
-
148
-
149
-
150
-
151
-
152
-
153
-
154
-
155
-
156
-
157
-
158
-
159
-
160
-
161
-
162
-
163
-
164
-
165
-
166
-
167
-
168
-
169
-
170
 |
 |
