Konica Minolta AccurioPress C6085 AccurioPress C6100/C6085 AccurioPress C3080/
Konica Minolta AccurioPress C6085 Manual
 |
View all Konica Minolta AccurioPress C6085 manuals
Add to My Manuals
Save this manual to your list of manuals |
Konica Minolta AccurioPress C6085 manual content summary:
- Konica Minolta AccurioPress C6085 | AccurioPress C6100/C6085 AccurioPress C3080/ - Page 1
- Konica Minolta AccurioPress C6085 | AccurioPress C6100/C6085 AccurioPress C3080/ - Page 2
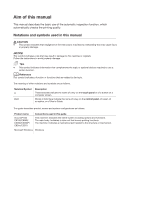
Notations and symbols used in this manual 7 CAUTION - This symbol indicates that negligence of the instructions may lead to mishandling that may Product name AccurioPress C6100/C6085/ C3080/C3080P/ C83hc/C3070 Conventions used in this guide This machine: Indicates the entire system including options - Konica Minolta AccurioPress C6085 | AccurioPress C6100/C6085 AccurioPress C3080/ - Page 3
...5-2 6 Automatic Inspection Area 6.1 What Is the Automatic Inspection Area 6-2 Overview ...6-2 Inspection Excluding Area ...6-2 Barcode Area ...6-2 Serial No. (0-9) Area ...6-3 6.2 Setting an Inspection Area...6-3 Automatic Inspection Operation Manual Contents-1 - Konica Minolta AccurioPress C6085 | AccurioPress C6100/C6085 AccurioPress C3080/ - Page 4
Area 7-14 Overview ...7-14 Procedure (Creating a Reference Image 7-14 Procedure (Setting an Inspection Area 7-14 Procedure (Decoding) ...7-16 8 Troubleshooting 8.1 If an Out-of-Range Image is Detected 8-2 Out-of-range image report status and remedy 8-2 Automatic Inspection Operation - Konica Minolta AccurioPress C6085 | AccurioPress C6100/C6085 AccurioPress C3080/ - Page 5
1 Overview of Function - Konica Minolta AccurioPress C6085 | AccurioPress C6100/C6085 AccurioPress C3080/ - Page 6
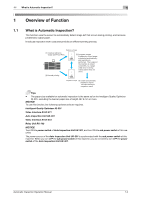
power switch of this machine, you do not need to turn OFF the power switch of the Auto Inspection Unit UK-301. Automatic Inspection Operation Manual 1-2 - Konica Minolta AccurioPress C6085 | AccurioPress C6100/C6085 AccurioPress C3080/ - Page 7
of the Auto Inspection Unit UK-301. For details on the default administrator password, refer to [Safety Information] in the separate volume. Automatic Inspection Operation Manual 1-3 - Konica Minolta AccurioPress C6085 | AccurioPress C6100/C6085 AccurioPress C3080/ - Page 8
2 Automatic Inspection Setting - Konica Minolta AccurioPress C6085 | AccurioPress C6100/C6085 AccurioPress C3080/ - Page 9
value for the number of detected errors is set to "0", this machine will not stop even if the number of detection increases. Automatic Inspection Operation Manual 2-2 - Konica Minolta AccurioPress C6085 | AccurioPress C6100/C6085 AccurioPress C3080/ - Page 10
and [Premium], for each of which you can adjust the detection standard. For details, refer to "2.1.2 [Automatic Inspection Level Setting]" in this manual. Set the automatic inspection on the Wait screen. When outputting a print job for Direct Print and such without temporarily saving it, input the - Konica Minolta AccurioPress C6085 | AccurioPress C6100/C6085 AccurioPress C3080/ - Page 11
-417 is installed on the machine, [Level Setting] is displayed. Select [Essential], [Standard], or [Premium] to specify the level for each item. Automatic Inspection Operation Manual 2-4 - Konica Minolta AccurioPress C6085 | AccurioPress C6100/C6085 AccurioPress C3080/ - Page 12
Auto Inspection Unit UK-301. Specify the line speed of the Auto Inspection Unit UK-301. Adjust to suit your network environment. Automatic Inspection Operation Manual 2-5 - Konica Minolta AccurioPress C6085 | AccurioPress C6100/C6085 AccurioPress C3080/ - Page 13
the detection report memory of the Auto Inspection Unit UK-301. Tips - If available memory space runs out, the job may be stopped. Follow the instruction shown in [Available Capacity Recovery Method] to increase the amount of available memory space. Automatic Inspection Operation - Konica Minolta AccurioPress C6085 | AccurioPress C6100/C6085 AccurioPress C3080/ - Page 14
IP Filtering] [TLS Setting] [HDD Encryption Set. (UK-301)] [Delete All Data Setting] [U-ROM Digital Signature Set.] [HDD ALL Backup] [HDD ALL Restore] Description Specify the password for Web Utilities of uncreated automatic inspection reports in advance. Automatic Inspection Operation Manual 2-7 - Konica Minolta AccurioPress C6085 | AccurioPress C6100/C6085 AccurioPress C3080/ - Page 15
below. - [Utility] - [Administrator Setting] - [Network Setting] - [NIC Settings] - [Detail Settings] - [Status Notif. Setting] - [Register Notif. Address] - [E-mail] - [ON] - [Notification Items] - [Auto Inspection] Automatic Inspection Operation Manual 2-8 - Konica Minolta AccurioPress C6085 | AccurioPress C6100/C6085 AccurioPress C3080/ - Page 16
Specify whether to allow log storage when a service call occurs.To allow logs, specify whether to log storage when a service call occurs. The stored logs are used to help the service representative's work. Specify problem even if the image attracts someone's attention. Automatic Inspection Operation - Konica Minolta AccurioPress C6085 | AccurioPress C6100/C6085 AccurioPress C3080/ - Page 17
reference chart. - Inspection chart: The inspection chart includes dots in the table. Tips - For details on how to obtain automatic inspection test charts, contact your service representative. Automatic Inspection Operation Manual 2-10 - Konica Minolta AccurioPress C6085 | AccurioPress C6100/C6085 AccurioPress C3080/ - Page 18
, refer to "2.1 Presetting the Details of Automatic Inspection" in this manual. In this step, configure the following settings. [Automatic Reprint when Creating a New Reference Image for Automatic Inspection" in this manual. 4 Perform automatic inspection using the reference image created in - Konica Minolta AccurioPress C6085 | AccurioPress C6100/C6085 AccurioPress C3080/ - Page 19
Level 2 5 Check the automatic inspection report. Check the report following the procedure described in "4.1 Confirming the Automatic Inspection Report" in this manual. Check whether the levels specified in step 2 match the values framed in red. NOTICE The result of automatic inspection may vary - Konica Minolta AccurioPress C6085 | AccurioPress C6100/C6085 AccurioPress C3080/ - Page 20
3 Performing Automatic Inspection - Konica Minolta AccurioPress C6085 | AccurioPress C6100/C6085 AccurioPress C3080/ - Page 21
refer to [Job Management] in the HTML User's Guide. 2 Press [JOB LIST] on the [MACHINE] screen to display the [Hold Job] screen. 3 Select the held print job, and press [Job Ticket]. The [Job Ticket Edit] screen is displayed. 4 Press [Auto Inspection]. The [Automatic Inspection Setting] - Konica Minolta AccurioPress C6085 | AccurioPress C6100/C6085 AccurioPress C3080/ - Page 22
New] check box in [Reference Image Setting]. 7 Specify each item, and press [OK] to apply the setting. When deleting [Reference Image] when printing is Level Setting], specify the desired level depending on the output purpose. 8 Press [New Store] or [Overwrite]. The setting is stored, and the - Konica Minolta AccurioPress C6085 | AccurioPress C6100/C6085 AccurioPress C3080/ - Page 23
A job ticket can be changed in [Setting]. 10 Check the contents, and press [Output]. The print job starts, and [Auto Inspection] is performed. If an Inspection Area], refer to "6. Automatic Inspection Area" in this manual. Then, follow the procedure described in "3.2 Selecting the Created - Konica Minolta AccurioPress C6085 | AccurioPress C6100/C6085 AccurioPress C3080/ - Page 24
3.1 Creating a New Reference Image for Automatic Inspection 3 Tips - [Auto Inspection] can also be configured using JobCentro or AccurioPro Print Manager. Automatic Inspection Operation Manual 3-5 - Konica Minolta AccurioPress C6085 | AccurioPress C6100/C6085 AccurioPress C3080/ - Page 25
refer to [Job Management] in the HTML User's Guide. 2 Press [JOB LIST] on the [MACHINE] screen to display the [Hold Job] screen. 3 Select the held print job, and press [Job Ticket]. The [Job Ticket Edit] screen is displayed. 4 Press [Auto Inspection]. The [Automatic Inspection Setting] - Konica Minolta AccurioPress C6085 | AccurioPress C6100/C6085 AccurioPress C3080/ - Page 26
Setting] screen. 8 Specify each item, and press [OK] to apply the setting. When deleting [Reference Image] when printing is finished, select [Delete at the End]. In [Inspection Level Setting], specify the desired level depending on the output purpose. Automatic Inspection Operation Manual 3-7 - Konica Minolta AccurioPress C6085 | AccurioPress C6100/C6085 AccurioPress C3080/ - Page 27
is stored, and the display returns to the [Hold Job] screen. 10 Press [Output], select [Normal] in [Output Method], and press [OK]. The print job starts, and [Auto Inspection] is performed. If an details, refer to "6. Automatic Inspection Area" in this manual. Automatic Inspection Operation - Konica Minolta AccurioPress C6085 | AccurioPress C6100/C6085 AccurioPress C3080/ - Page 28
3.2 Selecting the Created Reference Image for Automatic Inspection 3 Tips - The reference image can also be selected using JobCentro or AccurioPro Print Manager. Automatic Inspection Operation Manual 3-9 - Konica Minolta AccurioPress C6085 | AccurioPress C6100/C6085 AccurioPress C3080/ - Page 29
procedure, refer to the HTML User's Guide. 2 Press [Create Reference Image], and enter [Number of Ref. Image Pages]. 3 Press Start on the control panel. One Inspection] screen is automatically displayed on the touch panel. 4 Press [Inspection], and confirm [Reference Image/Area Setting] and [ - Konica Minolta AccurioPress C6085 | AccurioPress C6100/C6085 AccurioPress C3080/ - Page 30
3.3 Creating a New Reference Image for Automatic Inspection Using a Wait Setting Job 3 5 Press Start on the control panel. The print job starts, and [Auto Inspection] is performed. If this machine or in Web Utilities of the Auto Inspection Unit UK-301. Automatic Inspection Operation Manual 3-11 - Konica Minolta AccurioPress C6085 | AccurioPress C6100/C6085 AccurioPress C3080/ - Page 31
the control panel. % For details on the wait output procedure, refer to the HTML User's Guide. 2 Press [Change Setting] under [Reference Image/Area Setting]. The [Reference Image Selection] screen is displayed. Utilities of the Auto Inspection Unit UK-301. Automatic Inspection Operation Manual 3-12 - Konica Minolta AccurioPress C6085 | AccurioPress C6100/C6085 AccurioPress C3080/ - Page 32
4 Automatic Inspection Report - Konica Minolta AccurioPress C6085 | AccurioPress C6100/C6085 AccurioPress C3080/ - Page 33
To create [AutoInspect.Report], enable [Create Auto Inspection Report] before performing automatic inspection. To display [AutoInspect.Report], configure [Automatic Inspection NIC Setting]. Automatic Inspection Operation Manual 4-2 - Konica Minolta AccurioPress C6085 | AccurioPress C6100/C6085 AccurioPress C3080/ - Page 34
the report from the machine 4 4.2 Viewing the report from the machine Procedure 1 Press [AutoInspect.Report] on the [MACHINE] screen. The login window opens. 2 Enter [User Name] and [Password] that are stored, press [Web Browser] on the [MACHINE] screen, select [Menu] - [Setting] - [Setting], and - Konica Minolta AccurioPress C6085 | AccurioPress C6100/C6085 AccurioPress C3080/ - Page 35
, you need to enter [User Name] and [Password] every time depending on the option configuration. 3 Press [Link (Report)]. A list of [Completed Job] and [Out of range] is displayed. Display item Select an unnecessary report, and press [Delete] to delete such a report. Automatic Inspection Operation - Konica Minolta AccurioPress C6085 | AccurioPress C6100/C6085 AccurioPress C3080/ - Page 36
. Pressing [Close] on the lower right of the screen returns to the [Completed Job], [Out of range] screen. % For details on Automatic Inspection Report, refer to "4.3 Viewing the report via Web Utilities of the Auto Inspection Unit UK-301" in this manual. Automatic Inspection Operation Manual 4-5 - Konica Minolta AccurioPress C6085 | AccurioPress C6100/C6085 AccurioPress C3080/ - Page 37
the machine 4 6 Select the part you want to check, and press [OK]. The detected page is displayed. % For details on the detection on the stain level, refer to "2.1.2 [Automatic Inspection Level Setting]" in this manual. XXX: Serial No. Indicates the total number of detected omissions. Up to 20 - Konica Minolta AccurioPress C6085 | AccurioPress C6100/C6085 AccurioPress C3080/ - Page 38
system failed in alignment with the reference image. Displayed when the system failed to create a report. Displayed when many stains were detected. Automatic Inspection Operation Manual 4-7 - Konica Minolta AccurioPress C6085 | AccurioPress C6100/C6085 AccurioPress C3080/ - Page 39
] in the HTML User's Guide. 2 Enter the following URL in the address bar and press [Enter]. "http://< IP address the operation contents and [Extension for maintenance] of the menu for a service engineer (CE) are displayed on the top page of Web Utilities. Automatic Inspection Operation Manual 4-8 - Konica Minolta AccurioPress C6085 | AccurioPress C6100/C6085 AccurioPress C3080/ - Page 40
1,000 pages can be created as a report. If the number of pages exceeds 1,000, the excess is divided into another PDF file. Automatic Inspection Operation Manual 4-9 - Konica Minolta AccurioPress C6085 | AccurioPress C6100/C6085 AccurioPress C3080/ - Page 41
inspection standard. If you view a report via Web Utilities of the Auto Inspection Unit UK-301, the problem part is framed in red, and the reason is displayed. [Decoding result] Shows a report of the the inspection level. Standard Essential Premium Automatic Inspection Operation Manual 4-10 - Konica Minolta AccurioPress C6085 | AccurioPress C6100/C6085 AccurioPress C3080/ - Page 42
Displays the items specified in [Automatic Inspection Level Setting]. For details, refer to "2.1.2 [Automatic Inspection Level Setting]" in this manual. Name [Stain Detection Level] [Paper Noise Removal Level] [Image Edge Detection Sensitivity] [Permission Level for Stain] Description Displays - Konica Minolta AccurioPress C6085 | AccurioPress C6100/C6085 AccurioPress C3080/ - Page 43
number did not match. Displays the number of pages in which the ascending order or descending order of a number did not match. Automatic Inspection Operation Manual 4-12 - Konica Minolta AccurioPress C6085 | AccurioPress C6100/C6085 AccurioPress C3080/ - Page 44
via Web Utilities of the Auto Inspection Unit UK-301 4 Out of range The part related to the problem is framed in red, and details are displayed as shown below. Name [Stain(XXX)] [Level(X)] lateral position, and "y" indicates the vertical position.) Automatic Inspection Operation Manual 4-13 - Konica Minolta AccurioPress C6085 | AccurioPress C6100/C6085 AccurioPress C3080/ - Page 45
enclose image failures such as stains or omissions. Sets the color of the frame to enclose a number or bar code reading error. Automatic Inspection Operation Manual 4-14 - Konica Minolta AccurioPress C6085 | AccurioPress C6100/C6085 AccurioPress C3080/ - Page 46
5 Reference Image - Konica Minolta AccurioPress C6085 | AccurioPress C6100/C6085 AccurioPress C3080/ - Page 47
[InspectionAreaSet.] Specify the inspection area of the selected reference image. For details, refer to "6. Automatic Inspection Area" in this manual. [MultipleSelect] Select multiple reference images. When multiple reference images are selected, you cannot move the list or set the inspection - Konica Minolta AccurioPress C6085 | AccurioPress C6100/C6085 AccurioPress C3080/ - Page 48
6 Automatic Inspection Area - Konica Minolta AccurioPress C6085 | AccurioPress C6100/C6085 AccurioPress C3080/ - Page 49
[Select Area Type], sequential check can be set. For details, refer to "7.4 Performing Sequential Check for the Barcode Area or Serial No. (0-9) Area" in this manual. Automatic Inspection Operation - Konica Minolta AccurioPress C6085 | AccurioPress C6100/C6085 AccurioPress C3080/ - Page 50
Type], sequential check can be set. For details, refer to "7.4 Performing Sequential Check for the Barcode Area or Serial No. (0-9) Area" in this manual. - If a space between numbers in the target area is narrow when a number is read in [Serial No. (0-9) Area], a recognition error may occur. - If - Konica Minolta AccurioPress C6085 | AccurioPress C6100/C6085 AccurioPress C3080/ - Page 51
6.2 Setting an Inspection Area 6 1 Press [InspectionAreaSet.] on the [Reference Image Management] screen. % You can also [Select Target Page] [Select Area] [Excluding Edge Setting] Automatic Inspection Operation Manual Description Specify the type of area to set. Select the page that is targeted - Konica Minolta AccurioPress C6085 | AccurioPress C6100/C6085 AccurioPress C3080/ - Page 52
Area] in [Select Area Type]. This function is optional. For details, contact your service representative. 3 Press [Complete]. Tips - The sides and pages selected in [Select Target Page] are No.1 N Area No.1 1 Back Area No.1 2 Area No.1 3 Area No.1 N Automatic Inspection Operation Manual 6-5 - Konica Minolta AccurioPress C6085 | AccurioPress C6100/C6085 AccurioPress C3080/ - Page 53
7 Output Setting - Konica Minolta AccurioPress C6085 | AccurioPress C6100/C6085 AccurioPress C3080/ - Page 54
output to the Purge Tray to ensure the page order of the printout remains as intended. - Example shown in this manual Image beyond standard Purge Reprint instruction UK-301 Image within Finisher standard RU-702 IQ-501 panel This example describes a system configuration to output a printout - Konica Minolta AccurioPress C6085 | AccurioPress C6100/C6085 AccurioPress C3080/ - Page 55
7.1 Outputting a Printout with an Error Detected to Another Tray 7 Procedure 1 Press [IQ Function Setting] on the [MACHINE] screen. The [IQ Function Setting] screen is displayed. 2 Select [Continue Output] in [Operation after Deviation/Out of Range was - Konica Minolta AccurioPress C6085 | AccurioPress C6100/C6085 AccurioPress C3080/ - Page 56
to Another Tray 7 3 Select [Purge Tray] of [Output Tray for Out of Range]. 4 Press [OK]. 5 Automatic inspection and printing are performed. For details, refer to "3. Performing Automatic Inspection" in this manual. If an error is detected during printing, the printout subject to the detected - Konica Minolta AccurioPress C6085 | AccurioPress C6100/C6085 AccurioPress C3080/ - Page 57
printout and a printout with an error detected are mixed in the same tray. Check the automatic inspection report, and manually take the appropriate action. Procedure 1 Press [IQ Function Setting] on the [MACHINE] screen. The [IQ Function Setting] screen is displayed. Automatic Inspection Operation - Konica Minolta AccurioPress C6085 | AccurioPress C6100/C6085 AccurioPress C3080/ - Page 58
is continued even if an error is detected multiple times. 3 Select [Same as the Job] of [Output Tray for Out of Range]. Automatic Inspection Operation Manual 7-6 - Konica Minolta AccurioPress C6085 | AccurioPress C6100/C6085 AccurioPress C3080/ - Page 59
Out of Range was Detected]. 5 Select [ON] in [Create Auto Inspection Report]. 6 Press [OK]. 7 Automatic inspection and printing are performed. For details, refer to "3. Performing Automatic Inspection" in this manual. When an error is detected during printing, a printout is also output to the same - Konica Minolta AccurioPress C6085 | AccurioPress C6100/C6085 AccurioPress C3080/ - Page 60
IQ-501 Auto Inspection Unit UK-301 Relay Unit RU-702 Video Interface Kit VI-511 Video Interface Kit VI-513 Procedure (Creating a Reference Image) 1 Press [IQ Function Setting] on the [MACHINE] screen. The [IQ Function Setting] screen is displayed. Automatic Inspection Operation - Konica Minolta AccurioPress C6085 | AccurioPress C6100/C6085 AccurioPress C3080/ - Page 61
to configure the setting. 2 Select [ON] in [Create Auto Inspection Report], and press [OK]. 3 Hold a print job for creating a reference image on this machine. [Job Management] in the HTML User's Guide. 4 Press [JOB LIST] on the [MACHINE] screen to display the [Hold Job] screen. Automatic - Konica Minolta AccurioPress C6085 | AccurioPress C6100/C6085 AccurioPress C3080/ - Page 62
[Reference Image Setting]. % For details on the procedure, refer to "3.1. Creating a New Reference Image for Automatic Inspection" in this manual. 7 Press [Sample Output]. A reference image for automatic inspection is created. 8 Check the contents of the created reference image. % The printed data - Konica Minolta AccurioPress C6085 | AccurioPress C6100/C6085 AccurioPress C3080/ - Page 63
of the reference image created in "Procedure (Creating a Ref- erence Image)", and press [InspectionAreaSet]. The [InspectionAreaSet.] screen is displayed. 3 Set the inspection area on area to set it. 7 Press [Enter]. [Area Setting] is completed. Automatic Inspection Operation Manual 7-11 - Konica Minolta AccurioPress C6085 | AccurioPress C6100/C6085 AccurioPress C3080/ - Page 64
)". % For details on the procedure, refer to "3.2. Selecting the Created Reference Image for Automatic Inspection" in this manual. 5 Press [Output]. 6 Press [Normal] in [Output Method], and press [OK]. Printing starts, and data in the inspection area is decoded from the print image. % You can check - Konica Minolta AccurioPress C6085 | AccurioPress C6100/C6085 AccurioPress C3080/ - Page 65
view the automatic inspection report, refer to steps 1 to 5 in "4.3 Viewing the Report via Web Utilities of the Auto Inspection Unit UK-301" in this manual. 8 Click [Report] of the printed job, and click the file name of [Decoding result] on the displayed screen. The CSV file of the decoding result - Konica Minolta AccurioPress C6085 | AccurioPress C6100/C6085 AccurioPress C3080/ - Page 66
, referring to "Procedure (Creating a Reference Image)" of "7.3 Decoding the Barcode Area or Serial No. (0-9) Area to Check the Contents" in this manual. Procedure (Setting an Inspection Area) 1 Set the inspection area, referring to steps 1 to 8 in "Procedure (Setting an Inspection Area)" of "7.3 De - Konica Minolta AccurioPress C6085 | AccurioPress C6100/C6085 AccurioPress C3080/ - Page 67
. [Check the data between pages (only within the same area)] Check whether the number set in each area No. has been changed correctly between pages. 3 Press [Complete]. Automatic Inspection Operation Manual 7-15 - Konica Minolta AccurioPress C6085 | AccurioPress C6100/C6085 AccurioPress C3080/ - Page 68
Barcode Area or Serial No. (0-9) Area to Check the Contents" in this manual. 2 Confirm the downloaded CSV file data. Setting item [Check the data sheet are arranged in the order of "3" to "4", so there is no problem. • The decoding results for each area No. are arranged sequentially between sheets. - Konica Minolta AccurioPress C6085 | AccurioPress C6100/C6085 AccurioPress C3080/ - Page 69
8 Troubleshooting - Konica Minolta AccurioPress C6085 | AccurioPress C6100/C6085 AccurioPress C3080/ - Page 70
8 Troubleshooting levels. red circle was displayed level may be too high. • Inspection Level on the out-of-range im- Quality Optimizer IQ-501] in the HTML User's Guide. 3 An error occurs in the The original to "6. Automatic In- spection Area" in this manual. 4 A comment marked by a A stain - Konica Minolta AccurioPress C6085 | AccurioPress C6100/C6085 AccurioPress C3080/ - Page 71
refer to "6. Automatic In- spection Area" in this manual. A large stain is found on an image. If job matches the reference image. If no problems are identified, create a reference image again the HTML marked by a red circle is User's Guide. not displayed.) 7 Message "Inspection The paper size - Konica Minolta AccurioPress C6085 | AccurioPress C6100/C6085 AccurioPress C3080/ - Page 72
8.1 If an Out-of-Range Image is Detected 8 Automatic Inspection Operation Manual 8-4 - Konica Minolta AccurioPress C6085 | AccurioPress C6100/C6085 AccurioPress C3080/ - Page 73
- Konica Minolta AccurioPress C6085 | AccurioPress C6100/C6085 AccurioPress C3080/ - Page 74
A92W-IQ-E-11 © 2018 2020. 2
-
 1
1 -
 2
2 -
 3
3 -
 4
4 -
 5
5 -
 6
6 -
 7
7 -
8
-
9
-
10
-
11
-
12
-
13
-
14
-
15
-
16
-
17
-
18
-
19
-
20
-
21
-
22
-
23
-
24
-
25
-
26
-
27
-
28
-
29
-
30
-
31
-
32
-
33
-
34
-
35
-
36
-
37
-
38
-
39
-
40
-
41
-
42
-
43
-
44
-
45
-
46
-
47
-
48
-
49
-
50
-
51
-
52
-
53
-
54
-
55
-
56
-
57
-
58
-
59
-
60
-
61
-
62
-
63
-
64
-
65
-
66
-
67
-
68
-
69
-
70
-
71
-
72
-
73
-
74
 |
 |