Kenwood TH-D72 Operation Manual - Page 17
Connecting To A Regulated Power Supply, Connecting To A Pc
 |
View all Kenwood TH-D72 manuals
Add to My Manuals
Save this manual to your list of manuals |
Page 17 highlights
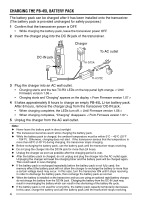
CONNECTING TO A REGULATED POWER SUPPLY To connect the transceiver to an appropriate regulated DC power supply, use an optional PG-2W DC cable. 1 Confirm that the power of both the transceiver and the DC power supply is OFF. 2 Connect the optional PG-2W DC cable to the DC power supply; the red lead to the positive (+) terminal, and the black lead to the negative (-) terminal. Fuses (3 A) 3 Connect the barrel plug on the DC cable to the DC IN jack of the transceiver. • While a DC power supply is connected with the DC IN jack, the transceiver automatically initiates charging the PB-45L battery pack. Note: ◆ If the DC power supply voltage is below 12.0 V DC, you may not be able to charge the PB-45L battery pack. ◆ The supply voltage must be between 12.0 V and 16.0 V to prevent damaging the transceiver. If the input voltage exceeds approximately 17.5 V, the transceiver automatically turns OFF. CONNECTING TO A PC The USB connector allows you to directly connect to a computer by using a supplied USB cable. • Download the virtual COM port driver from the URL listed below. http://www.kenwood.com/i/products/info/amateur/software_download.html PC PC (USB) port Supplied USB cable Depending on the usage condition of the USB apparatus, saved content may be lost. JVC KENWOOD does not take responsibility for damages or lost content. 7
-
 1
1 -
2
-
3
-
4
-
5
-
6
-
7
-
8
-
9
-
10
-
11
-
 12
12 -
 13
13 -
 14
14 -
 15
15 -
 16
16 -
 17
17 -
 18
18 -
 19
19 -
 20
20 -
 21
21 -
 22
22 -
23
-
24
-
25
-
26
-
27
-
28
-
29
-
30
-
31
-
32
-
33
-
34
-
35
-
36
-
37
-
38
-
39
-
40
-
41
-
42
-
43
-
44
-
45
-
46
-
47
-
48
-
49
-
50
-
51
-
52
-
53
-
54
-
55
-
56
-
57
-
58
-
59
-
60
-
61
-
62
-
63
-
64
-
65
-
66
-
67
-
68
-
69
-
70
-
71
-
72
-
73
-
74
-
75
-
76
-
77
-
78
-
79
-
80
-
81
-
82
-
83
-
84
-
85
-
86
-
87
-
88
-
89
-
90
-
91
-
92
-
93
-
94
-
95
-
96
-
97
-
98
-
99
-
100
-
101
-
102
-
103
-
104
-
105
-
106
-
107
-
108
-
109
-
110
-
111
-
112
-
113
-
114
-
115
-
116
-
117
-
118
-
119
-
120
-
121
-
122
-
123
-
124
-
125
-
126
-
127
-
128
-
129
-
130
-
131
-
132
-
133
-
134
-
135
-
136
-
137
-
138
-
139
-
140
-
141
-
142
-
143
-
144
-
145
-
146
-
147
-
148
-
149
-
150
-
151
-
152
-
153
-
154
-
155
-
156
 |
 |
