Invacare SOLARA3GLS4 Owners Manual - Page 109
This procedure applies to the bilateral contracture, footplate only.
 |
View all Invacare SOLARA3GLS4 manuals
Add to My Manuals
Save this manual to your list of manuals |
Page 109 highlights
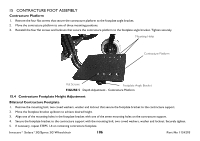
Replacing the Contracture Footplate Heel Loop This procedure applies to the bilateral contracture footplate only. 1. Tilt the contracture footplate forward to gain access to the mounting screws that secure the heel loop to the underside of the contracture footplate. Refer to Adjusting the Angle of the Bilateral Contracture Footplate on page 103. 2. Remove the four mounting screws and washers that secure the existing heel loop to the contracture footplate. 3. Reverse STEPS 1-2 to install the new heel loop. 15 CONTRACTURE FOOT ASSEMBLY Mounting Screws Washers Contracture Footplate Washers Heel Loop FIGURE 8 Replacing the Contracture Footplate Heel Loop Part No 1154295 109 Invacare® Solara®3G/Spree 3G Wheelchair
-
 1
1 -
2
-
3
-
4
-
5
-
6
-
7
-
8
-
9
-
10
-
11
-
12
-
13
-
14
-
15
-
16
-
17
-
18
-
19
-
20
-
21
-
22
-
23
-
24
-
25
-
26
-
27
-
28
-
29
-
30
-
31
-
32
-
33
-
34
-
35
-
36
-
37
-
38
-
39
-
40
-
41
-
42
-
43
-
44
-
45
-
46
-
47
-
48
-
49
-
50
-
51
-
52
-
53
-
54
-
55
-
56
-
57
-
58
-
59
-
60
-
61
-
62
-
63
-
64
-
65
-
66
-
67
-
68
-
69
-
70
-
71
-
72
-
73
-
74
-
75
-
76
-
77
-
78
-
79
-
80
-
81
-
82
-
83
-
84
-
85
-
86
-
87
-
88
-
89
-
90
-
91
-
92
-
93
-
94
-
95
-
96
-
97
-
98
-
99
-
100
-
101
-
102
-
103
-
 104
104 -
 105
105 -
 106
106 -
 107
107 -
 108
108 -
 109
109 -
 110
110 -
 111
111 -
 112
112 -
 113
113 -
 114
114 -
115
-
116
-
117
-
118
-
119
-
120
-
121
-
122
-
123
-
124
 |
 |

15
CONTRACTURE FOOT ASSEMBLY
Part No 1154295
109
Invacare® Solara®3G/Spree 3G Wheelchair
Replacing the Contracture Footplate Heel Loop
1.
Tilt the contracture footplate forward to gain access to the
mounting screws that secure the heel loop to the underside of the
contracture footplate. Refer to Adjusting the Angle of the Bilateral
Contracture Footplate
on page 103.
2.
Remove the four mounting screws and washers that secure the
existing heel loop to the contracture footplate.
3.
Reverse STEPS 1-2 to install the new heel loop.
FIGURE 8
Replacing the Contracture Footplate Heel Loop
This procedure applies to the bilateral contracture
footplate only.
Contracture
Footplate
Washers
Heel Loop
Mounting Screws
Washers