Hikvision DS-7204HQHI-K1 User Manual - Page 164
Configuring Cloud Storage
 |
View all Hikvision DS-7204HQHI-K1 manuals
Add to My Manuals
Save this manual to your list of manuals |
Page 164 highlights
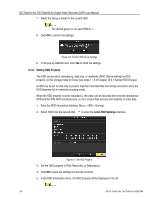
DS-72xxHUI-Kx, DS-72xxHQI-Kx Digital Video Recorder (DVR) User Manual 7. Select the camera(s) to be configured with the same quota settings. You can click the Analog checkbox to select all cameras. 8. Click OK to finish the Copy settings and go back to the Storage Mode interface. 9. Click Apply to apply the settings. If the quota capacity is set to 0, then all cameras will use the total HDD capacity for records. 12.5 Configuring Cloud Storage Cloud storage facilitates you to upload and download recorded files at any time and any place, which can highly enhance efficiency. 1. Enter the Cloud Storage interface, Menu > HDD > General > Cloud Storage. 2. Check the Enable Cloud checkbox to enable the feature. 3. Set the Cloud Type from the drop-down list to One Drive, Google Drive, or Drop Box. Figure 214, Cloud Storage Interface 4. Follow the prompts and use a mobile browser to scan the QR code to log in the selected cloud to get the authentication code. Then copy the authentication code to the Authentication Code text field. 5. Click Apply 6. Go back to the main menu. 162 UM DS-72xxHUI-Kx, DS-72xxHQI-Kx 062817NA
-
 1
1 -
2
-
3
-
4
-
5
-
6
-
7
-
8
-
9
-
10
-
11
-
12
-
13
-
14
-
15
-
16
-
17
-
18
-
19
-
20
-
21
-
22
-
23
-
24
-
25
-
26
-
27
-
28
-
29
-
30
-
31
-
32
-
33
-
34
-
35
-
36
-
37
-
38
-
39
-
40
-
41
-
42
-
43
-
44
-
45
-
46
-
47
-
48
-
49
-
50
-
51
-
52
-
53
-
54
-
55
-
56
-
57
-
58
-
59
-
60
-
61
-
62
-
63
-
64
-
65
-
66
-
67
-
68
-
69
-
70
-
71
-
72
-
73
-
74
-
75
-
76
-
77
-
78
-
79
-
80
-
81
-
82
-
83
-
84
-
85
-
86
-
87
-
88
-
89
-
90
-
91
-
92
-
93
-
94
-
95
-
96
-
97
-
98
-
99
-
100
-
101
-
102
-
103
-
104
-
105
-
106
-
107
-
108
-
109
-
110
-
111
-
112
-
113
-
114
-
115
-
116
-
117
-
118
-
119
-
120
-
121
-
122
-
123
-
124
-
125
-
126
-
127
-
128
-
129
-
130
-
131
-
132
-
133
-
134
-
135
-
136
-
137
-
138
-
139
-
140
-
141
-
142
-
143
-
144
-
145
-
146
-
147
-
148
-
149
-
150
-
151
-
152
-
153
-
154
-
155
-
156
-
157
-
158
-
 159
159 -
 160
160 -
 161
161 -
 162
162 -
 163
163 -
 164
164 -
 165
165 -
 166
166 -
 167
167 -
 168
168 -
 169
169 -
170
-
171
-
172
-
173
-
174
-
175
-
176
-
177
-
178
-
179
-
180
-
181
-
182
-
183
-
184
-
185
-
186
-
187
-
188
-
189
-
190
-
191
-
192
-
193
-
194
-
195
-
196
-
197
-
198
-
199
-
200
 |
 |
