HP Officejet X500 Officejet Pro X476/X576 Series Printers - IT Administrators - Page 9
Disable Job Storage, Printers and Faxes
 |
View all HP Officejet X500 manuals
Add to My Manuals
Save this manual to your list of manuals |
Page 9 highlights
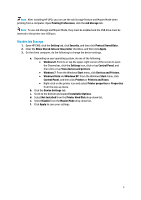
Note: After installing HP UPD, you can use the Job Storage feature and Mopier Mode when printing from a computer. Open Printing Preferences, click the Job Storage tab. Note: To use Job Storage and Mopier Mode, they must be enabled and the USB drive must be inserted in the printer rear USB port. Disable Job Storage 1. Open HP EWS, click the Setting tab, click Security, and then click Protect Stored Data. 2. Clear the Allow Stored Jobs on this printer checkbox, and then click Apply. 3. On the client computer, do the following to change the device settings. a. Depending on your operating system, do one of the following: • Windows 8: Point to or tap the upper-right corner of the screen to open the Charms bar, click the Settings icon, click or tap Control Panel, and then click or tap View devices and printers. • Windows 7: From the Windows Start menu, click Devices and Printers. • Windows Vista and Windows XP: From the Windows Start menu, click Control Panel, and then click Printers or Printers and Faxes. • Right-click on the printer icon and select Printer properties or Properties from the pop-up menu. b. Click the Device Settings tab. c. Scroll to the bottom and expand Installable Options. d. Select Not Installed from the Printer Hard Disk drop-down list. e. Select Disable from the Mopier Mode drop-down list. f. Click Apply to save your settings. 9
-
 1
1 -
2
-
3
-
 4
4 -
 5
5 -
 6
6 -
 7
7 -
 8
8 -
 9
9
 |
 |
