HP Officejet 2000 User Guide - Page 46
Remove numbers from the junk fax list, Add a Number, From Call History, Enter New Number, Settings
 |
View all HP Officejet 2000 manuals
Add to My Manuals
Save this manual to your list of manuals |
Page 46 highlights
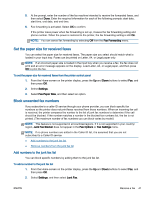
3. A message appears stating that Caller ID is required to block junk faxes. Select OK to continue. 4. Select Add a Number. 5. To select a fax number to block from the caller ID list, select From Call History. - or To manually enter a fax number to block, select Enter New Number. 6. After entering a fax number to block, select Done. NOTE: Make sure you enter the fax number as it appears on the control panel display, and not the fax number that appears on the fax header of the received fax, as these numbers can be different. Remove numbers from the junk fax list If you no longer want to block a fax number, you can remove a number from your junk fax list. To remove numbers from the list of junk fax numbers 1. From the Home screen on the printer display, press the Up and Down buttons to select Fax, and then press OK. 2. Select Settings, and then select Junk Fax. 3. Select the number you want to remove, and then select Remove a Number. 4. Press OK to confirm the deletion. 42 Chapter 6 Fax ENWW
-
 1
1 -
2
-
3
-
4
-
5
-
6
-
7
-
8
-
9
-
10
-
11
-
12
-
13
-
14
-
15
-
16
-
17
-
18
-
19
-
20
-
21
-
22
-
23
-
24
-
25
-
26
-
27
-
28
-
29
-
30
-
31
-
32
-
33
-
34
-
35
-
36
-
37
-
38
-
39
-
40
-
 41
41 -
 42
42 -
 43
43 -
 44
44 -
 45
45 -
 46
46 -
 47
47 -
 48
48 -
 49
49 -
 50
50 -
 51
51 -
52
-
53
-
54
-
55
-
56
-
57
-
58
-
59
-
60
-
61
-
62
-
63
-
64
-
65
-
66
-
67
-
68
-
69
-
70
-
71
-
72
-
73
-
74
-
75
-
76
-
77
-
78
-
79
-
80
-
81
-
82
-
83
-
84
-
85
-
86
-
87
-
88
-
89
-
90
-
91
-
92
-
93
-
94
-
95
-
96
-
97
-
98
-
99
-
100
-
101
-
102
-
103
-
104
-
105
-
106
-
107
-
108
-
109
-
110
-
111
-
112
-
113
-
114
-
115
-
116
-
117
-
118
-
119
-
120
-
121
-
122
-
123
-
124
-
125
-
126
-
127
-
128
-
129
-
130
-
131
-
132
-
133
-
134
-
135
-
136
-
137
-
138
-
139
-
140
 |
 |
