HP Officejet 2000 User Guide - Page 41
Schedule a fax to send later, Send a fax in Error Correction Mode, Settings, Schedule a Fax, Start
 |
View all HP Officejet 2000 manuals
Add to My Manuals
Save this manual to your list of manuals |
Page 41 highlights
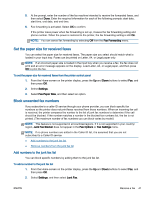
Schedule a fax to send later You can schedule a black and white fax to be sent within the next 24 hours. This enables you to send a black and white fax late in the evening, when phone lines are not as busy or phone rates are lower. The printer automatically sends your fax at the specified time. You can only schedule one fax to be sent at a time. You can continue to send faxes normally, while a fax is scheduled. NOTE: You can only send a black and white fax from memory. To schedule a fax from the printer control panel 1. Load your original print-side up in the ADF. For more information about loading the original, see Load original on page 24. 2. From the Home screen on the printer display, press the Up and Down buttons to select Fax, and then press OK. 3. Select Settings, and then select Schedule a Fax. 4. Enter the fax delay time by pressing the Up and Down buttons, and then press OK to confirm. 5. When you hear the dial tone, enter the number by using the keypad on the printer control panel. 6. Select Scan, select Start, and then press OK. The printer scans all pages and sends the fax at the scheduled time. To cancel a scheduled fax 1. From the Home screen on the printer display, press the Up and Down buttons to select Fax, and then press OK. 2. Select Settings, and then select Schedule a Fax. 3. Select the scheduled fax that you want to delete, select Delete, and then press OK. Send a fax in Error Correction Mode Error Correction Mode (ECM) prevents loss of data due to poor phone lines by detecting errors that occur during transmission and automatically requesting retransmission of the erroneous portion. Phone charges are unaffected, or might even be reduced, on good phone lines. On poor phone lines, ECM increases sending time and phone charges, but sends the data much more reliably. The default setting is On. Turn ECM off only if it increases phone charges substantially, and if you can accept poorer quality in exchange for reduced charges. Before turning the ECM setting off, consider the following. If you turn ECM off: ● The quality and transmission speed of faxes you send and receive are affected. ● The Fax Speed is automatically set to Medium. ● You can no longer send or receive faxes in color. ENWW Send a fax 37
-
 1
1 -
2
-
3
-
4
-
5
-
6
-
7
-
8
-
9
-
10
-
11
-
12
-
13
-
14
-
15
-
16
-
17
-
18
-
19
-
20
-
21
-
22
-
23
-
24
-
25
-
26
-
27
-
28
-
29
-
30
-
31
-
32
-
33
-
34
-
35
-
 36
36 -
 37
37 -
 38
38 -
 39
39 -
 40
40 -
 41
41 -
 42
42 -
 43
43 -
 44
44 -
 45
45 -
 46
46 -
47
-
48
-
49
-
50
-
51
-
52
-
53
-
54
-
55
-
56
-
57
-
58
-
59
-
60
-
61
-
62
-
63
-
64
-
65
-
66
-
67
-
68
-
69
-
70
-
71
-
72
-
73
-
74
-
75
-
76
-
77
-
78
-
79
-
80
-
81
-
82
-
83
-
84
-
85
-
86
-
87
-
88
-
89
-
90
-
91
-
92
-
93
-
94
-
95
-
96
-
97
-
98
-
99
-
100
-
101
-
102
-
103
-
104
-
105
-
106
-
107
-
108
-
109
-
110
-
111
-
112
-
113
-
114
-
115
-
116
-
117
-
118
-
119
-
120
-
121
-
122
-
123
-
124
-
125
-
126
-
127
-
128
-
129
-
130
-
131
-
132
-
133
-
134
-
135
-
136
-
137
-
138
-
139
-
140
 |
 |
