HP Indigo W7200 Blanket Creep Diagnosis and Correction - Page 25
Adjusting impression roller yaw angle,
 |
View all HP Indigo W7200 manuals
Add to My Manuals
Save this manual to your list of manuals |
Page 25 highlights
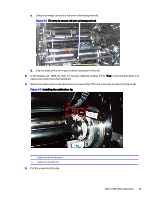
3. Holding the magnet, slide the rail block to the rear side of the press, and reset the indicator clock to zero. Figure 4-13 Sliding the rail block 4. Holding the magnet, gently slide the rail block to the front side of the press, and read the indicator result, pay attention to the direction of the indicator knob. 5. Write down the results in the Diagnostic form, box 22. Adjusting impression roller yaw angle Follow these steps to adjust impression roller yaw angle. 1. Release (do not open) the screws that hold the front impression arm (Figure 4-14 Rotating the adjustment screw on page 23), make sure that they are still holding the spring washer. Figure 4-14 Rotating the adjustment screw Adjusting impression roller yaw angle 23
-
 1
1 -
2
-
3
-
4
-
5
-
6
-
7
-
8
-
9
-
10
-
11
-
12
-
13
-
14
-
15
-
16
-
17
-
18
-
19
-
 20
20 -
 21
21 -
 22
22 -
 23
23 -
 24
24 -
 25
25 -
 26
26 -
 27
27 -
 28
28 -
 29
29
 |
 |

3.
Holding the magnet, slide the rail block to the rear side of the press, and reset the indicator clock to
zero.
Figure 4-13
Sliding the rail block
4.
Holding the magnet, gently slide the rail block to the front side of the press, and read the indicator
result, pay attention to the direction of the indicator knob.
5.
Write down the results in the Diagnostic form, box 22.
Adjusting impression roller yaw angle
Follow these steps to adjust impression roller yaw angle.
1.
Release (do not open) the screws that hold the front impression arm (
Figure 4-14
Rotating the
adjustment screw
on page
23
), make sure that they are still holding the spring washer.
Figure 4-14
Rotating the adjustment screw
Adjusting impression roller yaw angle
23