HP EliteOne 705 Hardware Reference Guide - Page 52
Push the latches toward the sides of the computer to lock the access panel in place 2.
 |
View all HP EliteOne 705 manuals
Add to My Manuals
Save this manual to your list of manuals |
Page 52 highlights
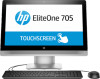
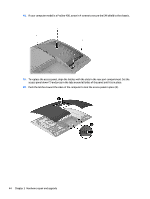
18. If your computer model is a ProOne 400, screw in 4 screws to secure the EMI shield to the chassis. 19. To replace the access panel, align the latches with the slots in the rear port compartment. Set the access panel down (1) and press in the tabs around all sides of the panel until it is in place. 20. Push the latches toward the sides of the computer to lock the access panel in place (2). 44 Chapter 3 Hardware repair and upgrade
-
 1
1 -
2
-
3
-
4
-
5
-
6
-
7
-
8
-
9
-
10
-
11
-
12
-
13
-
14
-
15
-
16
-
17
-
18
-
19
-
20
-
21
-
22
-
23
-
24
-
25
-
26
-
27
-
28
-
29
-
30
-
31
-
32
-
33
-
34
-
35
-
36
-
37
-
38
-
39
-
40
-
41
-
42
-
43
-
44
-
45
-
46
-
 47
47 -
 48
48 -
 49
49 -
 50
50 -
 51
51 -
 52
52 -
 53
53 -
 54
54 -
 55
55 -
 56
56 -
 57
57 -
58
-
59
-
60
-
61
-
62
-
63
-
64
-
65
-
66
-
67
-
68
-
69
-
70
-
71
-
72
-
73
-
74
 |
 |

18.
If your computer model is a ProOne 400, screw in 4 screws to secure the EMI shield to the chassis.
19.
To replace the access panel, align the latches with the slots in the rear port compartment. Set the
access panel down (1) and press in the tabs around all sides of the panel until it is in place.
20.
Push the latches toward the sides of the computer to lock the access panel in place (2).
44
Chapter 3
Hardware repair and upgrade