HP EliteDesk 705 65W G4 Maintenance and Service Guide 1 - Page 52
Internal WLAN antenna cables
 |
View all HP EliteDesk 705 65W G4 manuals
Add to My Manuals
Save this manual to your list of manuals |
Page 52 highlights
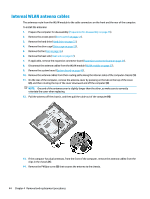
Internal WLAN antenna cables The antennas route from the WLAN module to the cable connectors on the front and the rear of the computer. To install the antennas: 1. Prepare the computer for disassembly (Preparation for disassembly on page 16). 2. Remove the access panel (Access panel on page 17). 3. Remove the hard drive (Hard drive on page 21). 4. Remove the drive cage (Drive cage on page 23). 5. Remove the fan (Fan on page 36). 6. Remove the heat sink (Heat sink on page 37). 7. If applicable, remove the expansion connector board (Expansion connector board on page 31). 8. Disconnect the antenna cables from the WLAN module (WLAN module on page 27). 9. Remove the system board (System board on page 40). 10. Remove the antenna cables from their routing paths along the interior sides of the computer chassis (1). 11. On the rear of the computer, remove the antenna cover by pressing on the tab on the top of the cover (2), and then rotating the top of the cover downward and off the computer (3). NOTE: One end of the antenna cover is slightly longer than the other, so make sure to correctly orientate the cover when replacing. 12. Pull the antenna off the chassis, and then pull the cable out of the computer (4). 13. If the computer has dual antennas, from the front of the computer, remove the antenna cables from the clips in the chassis (1). 14. Remove the Phillips screw (2) that secures the antenna to the chassis. 44 Chapter 4 Removal and replacement procedures
-
 1
1 -
2
-
3
-
4
-
5
-
6
-
7
-
8
-
9
-
10
-
11
-
12
-
13
-
14
-
15
-
16
-
17
-
18
-
19
-
20
-
21
-
22
-
23
-
24
-
25
-
26
-
27
-
28
-
29
-
30
-
31
-
32
-
33
-
34
-
35
-
36
-
37
-
38
-
39
-
40
-
41
-
42
-
43
-
44
-
45
-
46
-
 47
47 -
 48
48 -
 49
49 -
 50
50 -
 51
51 -
 52
52 -
 53
53 -
 54
54 -
 55
55 -
 56
56 -
 57
57 -
58
-
59
-
60
-
61
-
62
-
63
-
64
-
65
-
66
-
67
-
68
-
69
-
70
-
71
-
72
-
73
-
74
-
75
-
76
-
77
-
78
-
79
-
80
-
81
-
82
-
83
-
84
-
85
-
86
-
87
-
88
-
89
-
90
-
91
-
92
-
93
-
94
-
95
-
96
-
97
-
98
-
99
-
100
-
101
-
102
-
103
-
104
-
105
-
106
-
107
-
108
-
109
-
110
-
111
-
112
-
113
-
114
-
115
-
116
-
117
 |
 |
