HP EliteDesk 705 65W G4 Maintenance and Service Guide 1 - Page 29
Hard drive, Rotate the hard drive latch up
 |
View all HP EliteDesk 705 65W G4 manuals
Add to My Manuals
Save this manual to your list of manuals |
Page 29 highlights
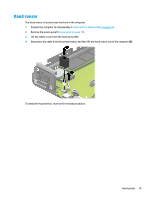
Hard drive Models with a hard drive and drive cage do not include a separate graphics processor card. For a list of available hard drives, see Computer major components on page 4. NOTE: Before you remove the old hard drive, be sure to back up the data from the old hard drive so that you can transfer the data to the new hard drive. 1. Prepare the computer for disassembly (Preparation for disassembly on page 16). 2. Remove the access panel (Access panel on page 17). 3. Rotate the hard drive latch up (1) to disengage the hard drive from the cage. Then slide the drive toward the rear of the chassis until it stops, and then lift the hard drive up and out of the cage (2). Hard drive 21
-
 1
1 -
2
-
3
-
4
-
5
-
6
-
7
-
8
-
9
-
10
-
11
-
12
-
13
-
14
-
15
-
16
-
17
-
18
-
19
-
20
-
21
-
22
-
23
-
 24
24 -
 25
25 -
 26
26 -
 27
27 -
 28
28 -
 29
29 -
 30
30 -
 31
31 -
 32
32 -
 33
33 -
 34
34 -
35
-
36
-
37
-
38
-
39
-
40
-
41
-
42
-
43
-
44
-
45
-
46
-
47
-
48
-
49
-
50
-
51
-
52
-
53
-
54
-
55
-
56
-
57
-
58
-
59
-
60
-
61
-
62
-
63
-
64
-
65
-
66
-
67
-
68
-
69
-
70
-
71
-
72
-
73
-
74
-
75
-
76
-
77
-
78
-
79
-
80
-
81
-
82
-
83
-
84
-
85
-
86
-
87
-
88
-
89
-
90
-
91
-
92
-
93
-
94
-
95
-
96
-
97
-
98
-
99
-
100
-
101
-
102
-
103
-
104
-
105
-
106
-
107
-
108
-
109
-
110
-
111
-
112
-
113
-
114
-
115
-
116
-
117
 |
 |

Hard drive
Models with a hard drive and drive cage do not include a separate graphics processor card.
For a list of available hard drives, see
Computer major components
on page
4
.
NOTE:
Before you remove the old hard drive, be sure to back up the data from the old hard drive so that you
can transfer the data to the new hard drive.
1.
Prepare the computer for disassembly (
Preparation for disassembly
on page
16
).
2.
Remove the access panel (
Access panel
on page
17
).
3.
Rotate the hard drive latch up
(1)
to disengage the hard drive from the cage. Then slide the drive toward
the rear of the chassis until it stops, and then lift the hard drive up and out of the cage
(2)
.
Hard drive
21