Harman Kardon BDS 770 Owners Manual - Page 13
Connecting to a Local Area Network LAN, Connect the Subwoofer Trigger Output, Connect the Remote IR
 |
View all Harman Kardon BDS 770 manuals
Add to My Manuals
Save this manual to your list of manuals |
Page 13 highlights
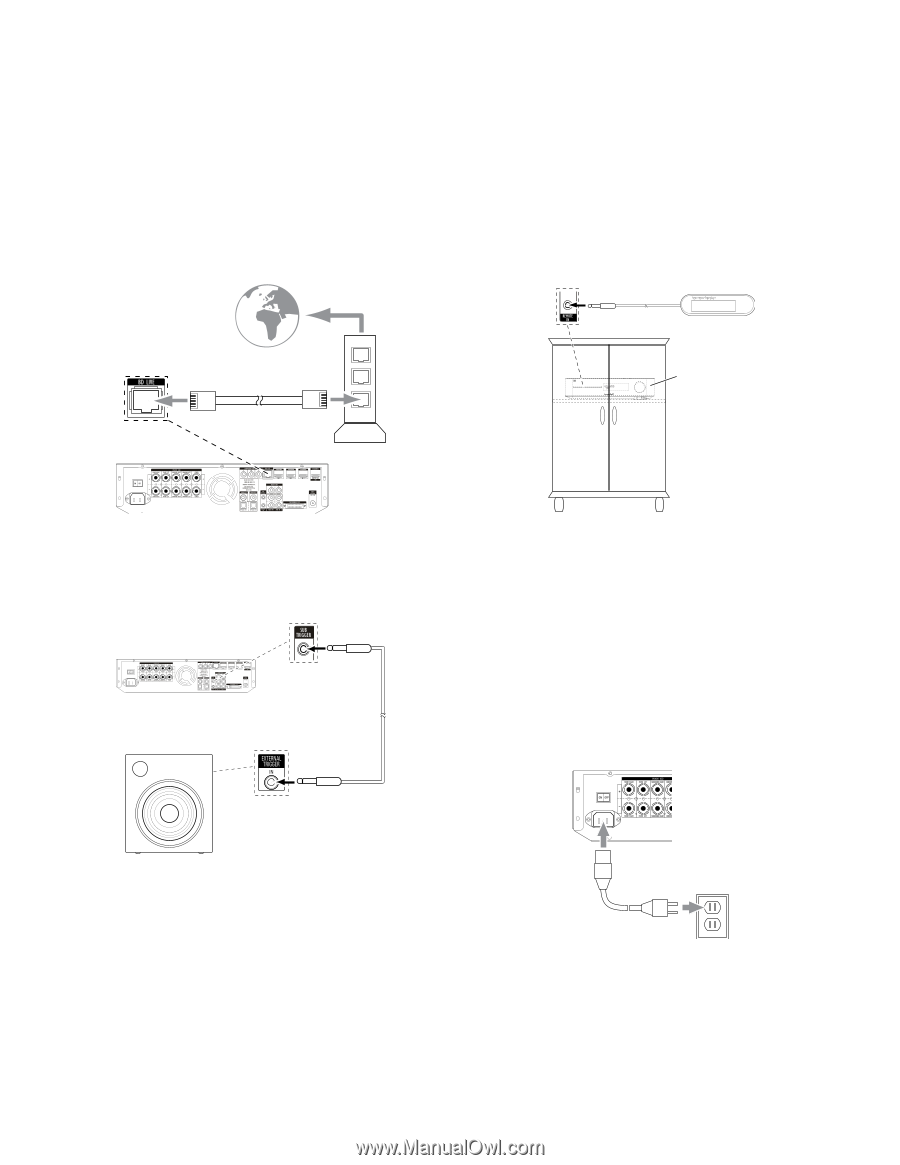
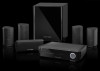
BDS 270/BDS 570 Connections Connecting to a Local Area Network (LAN) Use a Cat. 5/5E network cable (not supplied) to connect the BDS receiver's BD-Live connector directly to a network router, a network switch, a network modem or an Ethernet network wall jack that has Internet access. NOTE: The BDS receiver can not access content on other networked devices. The Network connection enables only the receiver's BD-Live features. See BD-Live Interactivity, on page 22, for details. To Internet Connect the Remote IR Input The BDS receiver is equipped with a Remote IR Input connector that lets you remotely control the receiver when you place it inside a cabinet or in a location that is out of the line of sight of the remote control. Connect an external IR receiver, such as the optional Harman Kardon HE 1000, to the receiver's Remote IR Input connector. BDS Receiver Remote IR Input Connector External IR Receiver Cat. 5/5E BDS Receiver Installed Inside of Cabinet Network Modem Connect the Subwoofer Trigger Output If your system has equipment that can be controlled by a DC trigger signal, connect it to the receiver's Subwoofer Trigger connector with a mono 1/8-inch (3.5mm) mini-plug interconnect cable (not supplied). The receiver will supply a 12V DC (100mA) trigger signal at this connection whenever it is powered on. Device with Trigger In Connector Mono 1/8-Inch (3.5mm) Mini-Plug Interconnect (not supplied) Connecting the AC Power The BDS receiver comes with a detachable AC power cord. This type of cord makes it easier for you to install and connect all other system wiring to the receiver's rear panel. The subwoofer has a non-detachable power cord. NOTES: •• The power requirement for the BDS receiver is 110V - 240V AC, 50/60Hz, 130W (BDS 570 receiver) or 90W (BDS 270 receiver). Connecting to a power source other than the ones listed may damage the receiver or cause abnormal operation. •• Before connecting the AC power cord to a wall outlet, confirm that you have correctly made all of the speaker connections, video connections and audiocomponent connections. Connect the female end of the receiver's detachable power cord to the receiver's AC Power connector. Plug the other end into a working, unswitched AC outlet. Receiver PL0004-01001 Set the receiver's Main Power switch to the "On" position. The receiver's Power indicator will turn amber, indicating that the receiver is in the Standby mode. 13
-
 1
1 -
2
-
3
-
4
-
5
-
6
-
7
-
 8
8 -
 9
9 -
 10
10 -
 11
11 -
 12
12 -
 13
13 -
 14
14 -
 15
15 -
 16
16 -
 17
17 -
 18
18 -
19
-
20
-
21
-
22
-
23
-
24
-
25
-
26
-
27
-
28
-
29
-
30
-
31
-
32
-
33
-
34
 |
 |