Harman Kardon AVR 2600 Owners Manual - Page 26
STEP FOUR, Set Up Sources, Audio and Video Input Selection - setup
 |
View all Harman Kardon AVR 2600 manuals
Add to My Manuals
Save this manual to your list of manuals |
Page 26 highlights
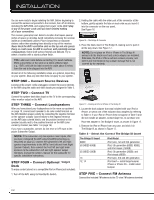
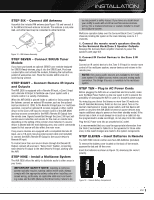
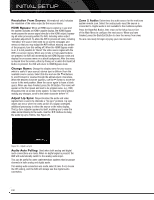
INITIAL SETUP NOTE: The AVR 2600 will automatically set its master volume to - 25dB. STEP FOUR - After you select "Continue", the screen shown in Figure 23 will appear. Select the number of speakers in your system. Select 5.1 if no surround back speakers are present or if the surround back channels will be used for multizone operation. Set Up Sources The Info Settings menu is used to assign the correct physical audio and video connections to each source. The following settings are not optional and must be adjusted now to enable playback of each source: Video Input From Source, Audio Input From Source and Resolution to Display. The other settings may be adjusted later. To display the Info Settings menu, press the Info Settings Button (front panel or remote). Or, from the Main Menu, select the Setup Source line and select a source from the slide-in menu. A screen similar to the one shown in Figure 25 will appear. Figure 23 - EzSet/EQ: Number of Speakers NOTE: If there are fewer than five main speakers in your system, do not use the EzSet/EQ process. Instead, proceed as described in the Advanced Functions section. If you have selected a 6.1-channel configuration with a single surround back speaker, use EzSet/EQ automatic configuration for 5.1 speakers, connect the single surround back speaker to the left Surround Back Speaker Output, then configure the surround back speaker manually, as described in the Advanced Functions section. The 6.1-channel configuration is not recommended. If the subwoofer is to be connected to the Front Speaker Outputs, do not connect the subwoofer until after running the EzSet/EQ process. The test will begin, and the screen shown in Figure 24 will appear. Maintain silence during the EzSet/EQ configuration. Figure 24 - EzSet/EQ in Progress As the EzSet/EQ system tests each speaker, its position will appear on screen. If the test sweep is heard from a different speaker than the one indicated on screen, turn off the AVR and check the speakerwire connections, then begin again. When the test is completed, select the Continue option. These options will be displayed: • View Settings: Select to view the results of the EzSet/EQ procedure. • Done: Select to return to the Speaker Setup menu. See the Advanced Functions section for instructions on how to manually configure the speakers or manually adjust the settings established by the EzSet/EQ process. Figure 25 - Setup Source Menu Audio Effects: Displays the Audio Effects submenu, where you may adjust the Dolby Volume setting, the bass and treble tone controls, the LFE trim, the Equalization On/Off setting and the MP3 enhancement for each source independently. Leave this submenu at its default settings, and return to it later if your system requires fine-tuning. See the Advanced Functions section for more information. Video Modes: Displays the Video Modes submenu, where you may make picture adjustments for each source independently. Leave the settings at their factory defaults. Picture adjustments should be made to your video display first, with this menu used only for finetuning. See the Advanced Functions section for more information. Surround Modes: Displays the Surround Modes submenu, where you may program surround modes for movies, music and games for each source independently. Digital surround signals, such as Dolby Digital and DTS, are automatically played in their native formats, although you may change the surround mode. See the Advanced Functions section for more information. Audio Format From Source: This line is informational only. When a digital program is playing, its format will be identified here. When analog audio programs are playing, this line displays ANALOG. Audio and Video Input Selection See Table A2 in the appendix for the factory default input assignments for each source. You may assign any available input to any source using the Info Settings menu. When a source is selected, the AVR will check the assigned digital audio input for a signal. If one is present, the digital input will be selected. If not, the AVR will select the analog audio input specified at the Audio Auto Polling line of the Info Settings menu. If you don't want the AVR to select an analog audio input for the source, leave this setting at its default of Off. 26
-
 1
1 -
2
-
3
-
4
-
5
-
6
-
7
-
8
-
9
-
10
-
11
-
12
-
13
-
14
-
15
-
16
-
17
-
18
-
19
-
20
-
 21
21 -
 22
22 -
 23
23 -
 24
24 -
 25
25 -
 26
26 -
 27
27 -
 28
28 -
 29
29 -
 30
30 -
 31
31 -
32
-
33
-
34
-
35
-
36
-
37
-
38
-
39
-
40
-
41
-
42
-
43
-
44
-
45
-
46
-
47
-
48
-
49
-
50
-
51
-
52
-
53
-
54
-
55
-
56
-
57
-
58
-
59
-
60
-
61
-
62
-
63
 |
 |
