Harbor Freight Tools 44914 User Manual - Page 9
Tool Set Up
 |
View all Harbor Freight Tools 44914 manuals
Add to My Manuals
Save this manual to your list of manuals |
Page 9 highlights
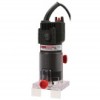
SAFETy Operating Instructions Read the ENTIRE IMpORTANT SAFETy INFORMATION section at the beginning of this manual including all text under subheadings therein before set up or use of this product. Tool Set Up TO pREVENT SERIOUS INJURy FROM AccIDENTAL OpERATION: Make sure that the Trigger is in the off-position and unplug the tool from its electrical outlet before performing any procedure in this section. Installing the Router Bit 1. Unplug the Router from the electrical outlet. 2. Place the Small Wrench over the Spindle to keep it from turning. 3. Using the Large Wrench, loosen the Collet Nut, but do not remove. Adjusting cutting Depth 4. If there is already a bit in the Collet Cone, remove it. 5. Push the shank end of the new bit into the opening in the Collet Nut. There may be some resistance, so make sure that it goes in all the way. 6. While holding the Small Wrench over the Spindle, tighten the Collet Nut with the Large Wrench. Set the depth of cut using the scale marked on the side of the Router. 1. Install the router bit as previously described. 2. Loosen the Base Knob. Slide the Base downward so the router bit is retracted within the Base. 3. Place the Base on a flat surface, and slide the Router down in the Base until the tip of the bit contacts the work surface. Tighten the Base Knob. 4. The scale on the Housing now shows the starting position. This starting position will vary depending on the bit used. 5. Add the desired depth of cut to the starting position. For example, if the starting position is 1" and the desired depth of cut is 1/2", the correct adjustment on the scale is 1-1/2". 6. Loosen the Base Knob, and raise the holder until the scale shows the correct reading; in this example 1-1/2". Tighten the Base Knob. 7. Make a test cut on a piece of scrap material to ensure that the adjustment is correct. SETUp OpERATION MAINTENANcE Item 44914 For technical questions, please call 1-800-444-3353. Page 9
-
 1
1 -
2
-
3
-
 4
4 -
 5
5 -
 6
6 -
 7
7 -
 8
8 -
 9
9 -
 10
10 -
 11
11 -
 12
12 -
 13
13 -
 14
14 -
15
-
16
 |
 |
