GE JVX3240SJSS Use and Care Manual - Page 15
Vertical duct-7 Round
 |
View all GE JVX3240SJSS manuals
Add to My Manuals
Save this manual to your list of manuals |
Page 15 highlights
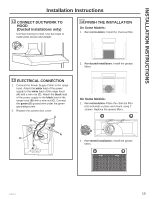
INSTALLATION PREPARATION Installation Preparation 1 SELECT VENT OPTION THAT YOUR INSTALLATION WILL REQUIRE (A-D) A Outside top exhaust (Vertical duct-3 1»4" x 10" Rectangular) B Outside top exhaust (Vertical duct-7" Round) 2 PREPARING MOUNTING For cabinets with dimensions below, the mounting bracket may be used for any model. Otherwise, the hood must mount directly to bottom of cabinet. Wood shims may be needed for cabinets with a recessed bottom. Skip to step B. Cabinet X 24" 22 1»2" 30" 28 1»2" 36" 34 1»2" X 3»4" Depth A To install the mounting bracket Drive (E) screws in partway into mounting bracket. The bracket labeled "R" will be used on the right side of the cabinet and the bracket labeled "L" will be used on the left side of the cabinet. C Outside rear exhaust (Horizontal duct-3 1»4" x 10" Rectangular) D Recirculating (Unit is configured from factory in this mode) E Under the cabinet that you are placing the range hood, attach the mounting bracket as shown below with (F) screws. Make sure orientation is correct. Brackets should be located against the back wall and flush with the bottom of the cabinet. Push against wall Flush with cabinet 49-80783-3 NOTE: Repeat on left side. 15
-
 1
1 -
2
-
3
-
4
-
5
-
6
-
7
-
8
-
9
-
 10
10 -
 11
11 -
 12
12 -
 13
13 -
 14
14 -
 15
15 -
 16
16 -
 17
17 -
 18
18 -
 19
19 -
 20
20 -
21
-
22
-
23
-
24
-
25
-
26
-
27
-
28
-
29
-
30
-
31
-
32
-
33
-
34
-
35
-
36
-
37
-
38
-
39
-
40
-
41
-
42
-
43
-
44
-
45
-
46
-
47
-
48
 |
 |
