GE JVM2052DNWW Installation Instructions - Page 15
B - Outside Back Exhaust, Prepare Rear Wall for Outside Back Exhaust, Attach Mounting Plate to Wall
 |
UPC - 084691188070
View all GE JVM2052DNWW manuals
Add to My Manuals
Save this manual to your list of manuals |
Page 15 highlights
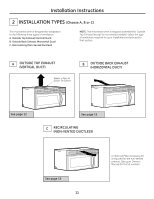
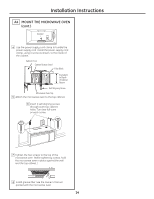
Installation Instructions B OUTSIDE BACK EXHAUST (Horizontal Duct) INSTALLATION OVERVIEW B1. Prepare Rear Wall B2. Attach Mounting Plate to Wall B3. Prepare Top Cabinet B4. Adjust Blower B5. Mount the Microwave Oven B1 PREPARE THE REAR WALL FOR OUTSIDE BACK EXHAUST You need to cut an opening in the rear wall for outside exhaust . • Read the instructions on the REAR WALL TEMPLATE. • Tape it to the rear wall, lining up with the holes previously drilled for holes A and B in the wall plate. • Cut the opening, following the instructions of the REAR WALL TEMPLATE. 15
-
 1
1 -
2
-
3
-
4
-
5
-
6
-
7
-
8
-
9
-
 10
10 -
 11
11 -
 12
12 -
 13
13 -
 14
14 -
 15
15 -
 16
16 -
 17
17 -
 18
18 -
 19
19 -
 20
20 -
21
-
22
-
23
-
24
 |
 |

15
Installation Instructions
OUTSIDE BACK EXHAUST
(Horizontal Duct)
INSTALLATION OVERVIEW
B1.
Prepare Rear Wall
B2.
Attach Mounting Plate to Wall
B3.
Prepare Top Cabinet
B4.
Adjust Blower
B5.
Mount the Microwave Oven
B
PREPARE THE REAR WALL
FOR OUTSIDE BACK EXHAUST
B1
You need to cut an opening in the rear wall for outside
exhaust.
•
Read the instructions on the REAR WALL TEMPLATE.
•
Tape it to the rear wall, lining up with the holes
previously drilled for holes A and B in the wall plate.
•
Cut the opening, following the instructions of the
REAR WALL TEMPLATE.