Epson WorkForce WF-7210 Users Guide - Page 135
Print Head Cleaning, Print Head Nozzle Check, Cleaning the Print Head Using a Computer Utility
 |
View all Epson WorkForce WF-7210 manuals
Add to My Manuals
Save this manual to your list of manuals |
Page 135 highlights
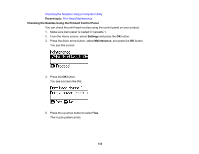
5. Check the printed pattern to see if there are gaps in the lines. Print head is clean Print head needs cleaning 6. If there are no gaps, click Finish. If there are gaps or the pattern is faint, clean the print head. If you don't see any improvement after cleaning the print head up to 4 times, wait at least 6 hours without printing or longer if printing. Then try cleaning the print head again. If quality still does not improve, one of the ink cartridges may be old or damaged and needs to be replaced. Parent topic: Print Head Nozzle Check Related tasks Cleaning the Print Head Using a Computer Utility Related topics Loading Paper Print Head Cleaning If print quality has declined and the nozzle check pattern indicates clogged nozzles, you can clean the print head. Use the nozzle check pattern to determine which colors need cleaning. You can save ink by cleaning only selected colors. 135
-
 1
1 -
2
-
3
-
4
-
5
-
6
-
7
-
8
-
9
-
10
-
11
-
12
-
13
-
14
-
15
-
16
-
17
-
18
-
19
-
20
-
21
-
22
-
23
-
24
-
25
-
26
-
27
-
28
-
29
-
30
-
31
-
32
-
33
-
34
-
35
-
36
-
37
-
38
-
39
-
40
-
41
-
42
-
43
-
44
-
45
-
46
-
47
-
48
-
49
-
50
-
51
-
52
-
53
-
54
-
55
-
56
-
57
-
58
-
59
-
60
-
61
-
62
-
63
-
64
-
65
-
66
-
67
-
68
-
69
-
70
-
71
-
72
-
73
-
74
-
75
-
76
-
77
-
78
-
79
-
80
-
81
-
82
-
83
-
84
-
85
-
86
-
87
-
88
-
89
-
90
-
91
-
92
-
93
-
94
-
95
-
96
-
97
-
98
-
99
-
100
-
101
-
102
-
103
-
104
-
105
-
106
-
107
-
108
-
109
-
110
-
111
-
112
-
113
-
114
-
115
-
116
-
117
-
118
-
119
-
120
-
121
-
122
-
123
-
124
-
125
-
126
-
127
-
128
-
129
-
 130
130 -
 131
131 -
 132
132 -
 133
133 -
 134
134 -
 135
135 -
 136
136 -
 137
137 -
 138
138 -
 139
139 -
 140
140 -
141
-
142
-
143
-
144
-
145
-
146
-
147
-
148
-
149
-
150
-
151
-
152
-
153
-
154
-
155
-
156
-
157
-
158
-
159
-
160
-
161
-
162
-
163
-
164
-
165
-
166
-
167
-
168
-
169
-
170
-
171
-
172
-
173
-
174
-
175
-
176
-
177
-
178
-
179
-
180
-
181
-
182
-
183
-
184
-
185
-
186
-
187
-
188
-
189
-
190
-
191
-
192
-
193
-
194
-
195
-
196
-
197
-
198
-
199
-
200
 |
 |
