Epson V11H068920 User Manual - Page 40
Adjusting the Image Shape, Using Keystone Correction
 |
View all Epson V11H068920 manuals
Add to My Manuals
Save this manual to your list of manuals |
Page 40 highlights
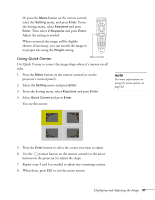
Projector foot 2. Once the image is positioned where you want it, release the buttons to lock the feet in position. 3. If necessary, you can level the picture or fine-tune the height by turning the projector feet. Raising the projector causes the image to distort or "keystone," but you can manually correct the shape as described in the next section. note The image will be slightly shorter after adjusting. If it's important to maintain the correct aspect ratio, use the menu system to perform Keystone correction, then adjust the Height setting as needed (see page 41). Adjusting the Image Shape In most cases, you can maintain a square or rectangular image by placing the projector directly in front of the center of the screen and using the Lens Shift (instead of tilting the projector upward) to adjust the image height. If this isn't possible, use one of these methods to correct the image shape: ■ If the image tapers inward on the right and left sides only, use Keystone correction as described below. ■ If the image looks uneven on all sides, you can adjust its shape using Quick Corner (see page 41). You cannot use both Keystone correction and Quick Corner at the same time. Using Keystone Correction To adjust your image when the right and left sides are uneven, do one of the following: ■ Use the Keystone buttons on the projector's control panel to adjust the image shape. Keystone buttons 40 Displaying and Adjusting the Image
-
 1
1 -
2
-
3
-
4
-
5
-
6
-
7
-
8
-
9
-
10
-
11
-
12
-
13
-
14
-
15
-
16
-
17
-
18
-
19
-
20
-
21
-
22
-
23
-
24
-
25
-
26
-
27
-
28
-
29
-
30
-
31
-
32
-
33
-
34
-
 35
35 -
 36
36 -
 37
37 -
 38
38 -
 39
39 -
 40
40 -
 41
41 -
 42
42 -
 43
43 -
 44
44 -
 45
45 -
46
-
47
-
48
-
49
-
50
-
51
-
52
-
53
-
54
-
55
-
56
-
57
-
58
-
59
-
60
-
61
-
62
-
63
-
64
-
65
-
66
-
67
-
68
-
69
-
70
-
71
-
72
-
73
-
74
-
75
-
76
-
77
-
78
-
79
-
80
-
81
-
82
-
83
-
84
-
85
-
86
-
87
-
88
-
89
-
90
-
91
-
92
-
93
-
94
-
95
-
96
-
97
-
98
-
99
-
100
-
101
-
102
-
103
-
104
-
105
-
106
-
107
-
108
-
109
-
110
-
111
-
112
-
113
-
114
-
115
-
116
-
117
-
118
-
119
-
120
-
121
-
122
-
123
-
124
-
125
-
126
-
127
-
128
-
129
-
130
-
131
-
132
-
133
-
134
-
135
-
136
-
137
-
138
 |
 |
