Epson TM-T88IV UB-U05 Users Manual - Page 4
Caution - driver
 |
View all Epson TM-T88IV manuals
Add to My Manuals
Save this manual to your list of manuals |
Page 4 highlights
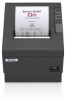
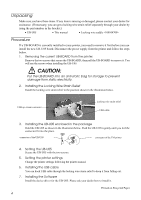
Unpacking Make sure you have these items. If any item is missing or damaged, please contact your dealer for assistance. (If necessary, you can get a locking wire strain relief separately through your dealer by using the part number in the bracket.) UB-U05 This manual Locking wire saddle Procedure If a UB-BOARD is currently installed in your printer, you need to remove it first before you can install the new UB-U05 board. Disconnect the power supply from the printer and follow the steps below. 1. Removing the current UB-BOARD from the printer. Remove the two screws that secure the UB-BOARD; then pull the UB-BOARD to remove it. You will use the screws when installing the UB-U05. CAUTION: Put the UB-BOARD into an anti-static bag for storage to prevent damage from static electricity. 2. Installing the Locking Wire Strain Relief Install the locking wire strain relief in the position shown in the illustration below. USB up stream connector Locking wire strain relief USB cable 3. Installing the UB-U05 enclosed in the package Hold the UB-U05 as shown in the illustration below. Push the UB-U05 in gently until you feel the connector fit into the place. connector of the UB-U05 connector of the TM printer 4. Setting the UB-U05 Secure the UB-U05 with the two screws. 5. Setting the printer settings Change the printer settings following the printer manual. 6. Installing the USB cable You can hook USB cable through the locking wire strain relief to keep it from falling out. 7. Installing the Software Install the device driver for the UB-U05. Please ask your dealer how to install it. Printed on Recycled Paper 4
-
 1
1 -
 2
2 -
 3
3 -
 4
4
 |
 |
