Epson OmniLink TM-L100 Technical Reference Guide - Page 48
After changing the necessary parameters, click the [Send] button., network administrator.
 |
View all Epson OmniLink TM-L100 manuals
Add to My Manuals
Save this manual to your list of manuals |
Page 48 highlights
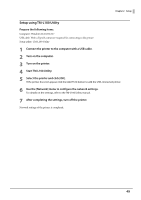
Chapter 2 Setup When accessing EpsonNet Config (web version) from your browser for initial setup, an authentication warning message will be displayed, but this is not a problem. 4 Input your user name and password on the authentication window. • The user name is "epson", and the default password is the serial number of the printer. You can find the serial number by running the self-test or on the nameplate attached to the printer. Nameplate • You can change the password in the [Optional] menu, under [Password]. 5 Change the settings based on the network setting information you received from the network administrator. Select an item from [Configuration] menu and change the setting. 6 After changing the necessary parameters, click the [Send] button. The changes are sent to the printer. 7 Click the [Reset] button on the Web page displayed after sending. The sent contents are enabled. Depending on the changes, such as the IP address, the connection with the setting computer may be lost and the EpsonNet Config window may not be displayed. To connect again, the network settings of the setting computer must be set to the same network segment as the printer whose settings were changed. 48
-
 1
1 -
2
-
3
-
4
-
5
-
6
-
7
-
8
-
9
-
10
-
11
-
12
-
13
-
14
-
15
-
16
-
17
-
18
-
19
-
20
-
21
-
22
-
23
-
24
-
25
-
26
-
27
-
28
-
29
-
30
-
31
-
32
-
33
-
34
-
35
-
36
-
37
-
38
-
39
-
40
-
41
-
42
-
 43
43 -
 44
44 -
 45
45 -
 46
46 -
 47
47 -
 48
48 -
 49
49 -
 50
50 -
 51
51 -
 52
52 -
 53
53 -
54
-
55
-
56
-
57
-
58
-
59
-
60
-
61
-
62
-
63
-
64
-
65
-
66
-
67
-
68
-
69
-
70
-
71
-
72
-
73
-
74
-
75
-
76
-
77
-
78
-
79
-
80
-
81
-
82
-
83
-
84
-
85
-
86
-
87
-
88
-
89
-
90
-
91
-
92
-
93
-
94
-
95
-
96
-
97
-
98
-
99
-
100
-
101
-
102
-
103
-
104
-
105
-
106
-
107
-
108
-
109
-
110
-
111
-
112
-
113
-
114
-
115
-
116
-
117
-
118
-
119
-
120
-
121
-
122
-
123
-
124
-
125
-
126
-
127
-
128
-
129
-
130
-
131
-
132
-
133
-
134
-
135
-
136
-
137
-
138
-
139
-
140
-
141
-
142
-
143
-
144
-
145
 |
 |
