Epic Fitness El 2790 Elliptical English Manual - Page 8
Tip: Avoid pinching the Right Control Wire
 |
View all Epic Fitness El 2790 Elliptical manuals
Add to My Manuals
Save this manual to your list of manuals |
Page 8 highlights
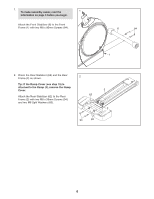
5. Apply a generous amount of grease to the Pivot Axle (35) and to two Wave Washers (95). Insert the Pivot Axle (35) through the Upright (4) and then center it. Slide a Wave Washer (95) onto each end of the Pivot Axle (35). 5 Grease 95 4 35 Grease 95 6. Identify the Right Upper Body Arm (61) and the Right Upper Body Leg (60), which are marked with "Right" stickers, and orient them as shown. Make sure that the hexagonal holes are in the position shown. Have a second person hold the Right Upper Body Arm (61) near the Right Upper Body Leg (60). Locate the wire tie in the Right Upper Body Leg (60). Tie the upper end of the wire tie to the Right Control Wire (41) located in the Right Upper Body Arm (61) (see the inset drawing). Next, pull the lower end of the wire tie until the Right Control Wire (41) is routed through the Right Upper Body Leg (60). Then, untie and discard the wire tie. Tip: Avoid pinching the Right Control Wire (41). Slide the Right Upper Body Arm (61) onto the Right Upper Body Leg (60). Attach the Right Upper Body Arm with two M8 x 38mm Bolts (96) and two M8 Locknuts (102). Make sure that the Locknuts are in the hexagonal holes. Repeat this step for the Left Upper Body Arm (not shown) and the Left Upper Body Leg (not shown). 6 Avoid pinching the wires 102 Hexagonal Holes 61 Wire Tie 60 96 41 Wire Tie 41 Wire Tie 8
-
 1
1 -
2
-
 3
3 -
 4
4 -
 5
5 -
 6
6 -
 7
7 -
 8
8 -
 9
9 -
 10
10 -
 11
11 -
 12
12 -
 13
13 -
14
-
15
-
16
-
17
-
18
-
19
-
20
-
21
-
22
-
23
-
24
-
25
-
26
-
27
-
28
 |
 |
