Dirt Devil M082476 Revision 3 (5/2003) - Page 8
Bag Removal And Replacement, DÉpose Et Remplacement Du Sac
 |
View all Dirt Devil M082476 manuals
Add to My Manuals
Save this manual to your list of manuals |
Page 8 highlights
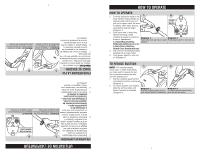
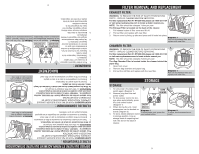
Diagram 3 Be sure inlet opening of the dusting bag is properly aligned with opening of hose connection. 8 5. Reconnect hose. (Diagram 3). the opening of hose connection dustbag is properly aligned with sure the inlet opening of the 4. Before re-connecting hose, be (Diagram 2). 3. Close front cover. 3. CORRECT into the chamber guides large tab of the bag chamber the release latch (hinge). 2. Return bag and bag chamber to the cleaner by sliding the Diagram 1 Replace bag to chamber. by locking the bag collar under BAG GUIDES (Diagram 1). Secure in place bag collar into the bag guides SIDE DOWN" portion of the Diagram 3 Remove bag by pressing the locking latch. 2. CHAMBER GUIDES Diagram 2 Return bag & bag chamber into chamber guides. INCORRECT DÉPOSE ET REMPLACEMENT DU SAC DÉPOSE DU SAC : AVERTISSEMENT : POUR NE PAS 1. VOUS BLESSER LORSQUE L'AP- PAREIL FONCTIONNE DÉBR- ANCHEZ-LE AVANT DE PROC- ÉDER À SON ENTRETIEN. 1. Lorsque l'indicateur de sac plein vire au rouge, il est temps de remlacer le sac. 2. Enlevez le tuyau en appuyant sur les 2 boutons situés à son Schéma 1 extrémité et en le tirant vers Soulevez la partie avant de le haut. l'appareil. 3. Tirez sur le bouton d'ouverture de l'avant de l'appareil (Schéma 1). 4. Soulevez le compartiment du sac alors que le sac est encore attaché (Schéma 2). REMARQUE: Le compartiment du sac restera attaché à la par- tie avant de l'appareil si le tuyau n'a pas été enlevé. 5. Enlevez le sac plein de son compartiment en appuyant sur le dispositif de déverrouillage (charnière) de ce dernier 2. Schéma 2 Soulevez le compartiment du sac. 3. DISPOSITIF DE DÉVERROUILLAGE (CHARNIÈRE) Schéma 3 Enlevez le sac en appuyant sur le dispositif de déverrouillage. chamber by inserting the "THIS 1. Insert a new bag into bag BAG REPLACEMENT: 1. BAG TYPE: P (hinge) of the bag chamber by pressing the release latch 5. Remove full bag from chamber removed. stick to front cover if hose isn't NOTE: Bag chamber may attached (Diagram 2). 4. Lift out bag chamber with bag (Diagram 1). 3. Pull release latch of front cover hose and pull upward. Pull up on filter cover. the 2 buttons at the end of the Diagram 1 2. Remove the hose by pressing 2. Diagram 2 Lift bag chamber. 3. RELEASE LATCH (HINGE) REMPLACEMENT DU SAC : 1. 2. TYPE DE SAC : P 1. Insérez tout d'abord la partie intitulée « THIS SIDE DOWN » (CE CÔTÉ VERS LE BAS) de l'embouchure du sac dans les fentes d'installation de ce dernier (Schéma 1). Fixez-le FENTES D'INSTALLATION DU SAC FENTES D'INSTALLATION DU COMPARTIMENT en bloquant son embouchure sous le dispositif de verrouillage (charnière). 2. Remettez le sac et son com- Schéma 1 Schéma 2 Réinsérez le sac Replacez le sac dans son com- et son compartiment dans les partiment. fentes d'installation. partiment dans l'aspirateur en faisant glisser la grande languette de ce dernier dans les fentes d'installation 3. CORRECTE INCORRECTE (Schéma 2). 3. Refermez la partie avant de l'appareil. 4. Avant de rebrancher le tuyau, assurez-vous que l'em- bouchure du sac à poussière est correctement alignée avec l'orifice du tuyau (Schéma 3). Schéma 3 5. Rebranchez le tuyau. Vérifiez que l'embouchure du sac à poussière est alignée avec l'ori- fice du tuyau. 8 your bag. turns red, you must replace 1. When the full bag indicator BEFORE SERVICING. PARTS - UNPLUG CLEANER OF INJURY FROM MOVING RISK WARNING: TO REDUCE THE 1. BAG REMOVAL: BAG REMOVAL AND REPLACEMENT
-
 1
1 -
2
-
 3
3 -
 4
4 -
 5
5 -
 6
6 -
 7
7 -
 8
8 -
 9
9 -
 10
10 -
 11
11 -
 12
12 -
 13
13 -
14
-
15
 |
 |