Dirt Devil M082476 Revision 3 (5/2003) - Page 6
How To Assemble, Shoulder Strap Installation, Assemblage De L'aspirateur, Installation De La
 |
View all Dirt Devil M082476 manuals
Add to My Manuals
Save this manual to your list of manuals |
Page 6 highlights
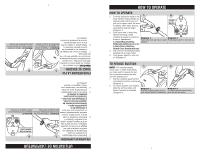
6 Press tabs in and up onto the bottom of canister. Diagram 1 (Diagram 2). ried from room to room 4. Cleaner can now be easily car- place (Diagram 1). 2. Diagram 2 The cleaner can be carried from room to room. ASSEMBLAGE DE L'ASPIRATEUR INSTALLATION DU TUYAU : 1. AVERTISSEMENT: POUR ÉVITER DE VOUS BLESSER - DÉBRANCHEZ L'ASPIRATEUR AVANT D'ENLEVER OU D'INSTALLER LE TUYAU. 1. Insérez le tuyau et enfoncez-le jusqu'à ce qu'il s'emboîte (Schéma 1). 3. Press in and up until secure in with grooves of cleaner. 2. Line up tabs of shoulder strap seated position. INSTALLATION: 1. 1. Hold cleaner in a vertical, SHOULDER STRAP SHOULDER STRAP INSTALLATION little to make the removal easier. the attachment back and forth a gently. You may gently rotate 4. To remove the tool, pull apart in place (Diagram 2). or wand end until it is secured ply push it firmly onto the hose ous cleaning needs. Then sim- on the tool caddy. accessories to meet your vari- Press tools into their location Diagram 1 3. Choose any of the handy tions (Diagram 1). tools into their respective loca- caddy onto the wand and slide on the unit, press the tool 2. Diagram 2 Simply push tools onto the hose or wand end until it is secured. separately in the box. To store 2. Attachments are packaged wands and tools. Schéma 1 Insérez le tuyau et enfoncez-le jusqu'à ce qu'il s'emboîte. INSTALLATION DES ACCESSOIRES : 1. 1. Le tuyau peut être utilisé seul ou avec plusieurs tubes et accessoires. 2. Ces derniers ont été emballés séparément dans la boîte. Pour les ranger sur l'appareil, emboîtez le porte-accessoires sur le tube et faites glisser les accessoires jusqu'à ce qu'ils soient en place (Schéma 1). 3. Choisissez l'accessoire dont vous avez besoin. Puis emboîtez-le fermement sur le Schéma 1 Emboîtez les accessoires sur le porte-accessoires. tuyau ou le tube jusqu'à ce qu'il soit en place (Schéma 2). 4. Pour l'enlevez, dégagez-le avec soin. Vous pouvez faire tourner lentement l'accessoire pour l'en- lever plus facilement. 2. Schéma 2 Il suffit de les emboîter dans l'extrémité du tuyau ou du tube jusqu'à ce qu'ils soient fixés. INSTALLATION DE LA BANDOULIÈRE INSTALLATION DE LA BANDOULIÈRE : 1. Maintenez fermement l'aspirateur en position verticale. 2. Alignez les languettes de la bandoulière avec les fentes de l'aspirateur. 3. Appuyez dessus jusqu'à ce qu'elles soient enclenchées (Schéma 1). 4. L'aspirateur peut désormais être transporté facilement d'une pièce à l'autre (Schéma 2). 1. Schéma 1 Appuyez sur les languettes et enfoncez-les dans la partie inférieure du réservoir. 2. Schéma 2 L'aspirateur peut désormais être transporté d'une pièce à l'autre. 6 with many combinations of 1. The hose can be used alone or 1. INSTALLATION: ATTACHMENT Diagram 1 Insert hose and press until it locks into place. HOW TO ASSEMBLE HOSE INSTALLATION: 1. WARNING: TO REDUCE THE RISK OF INJURY - UNPLUG CLEANER BEFORE REMOVING OR INSTALLING HOSE. 1. Insert hose and press until it locks into place (Diagram 1).
-
 1
1 -
 2
2 -
 3
3 -
 4
4 -
 5
5 -
 6
6 -
 7
7 -
 8
8 -
 9
9 -
 10
10 -
 11
11 -
 12
12 -
13
-
14
-
15
 |
 |
