Dewalt DW45RN Instruction Manual - Page 8
COMPONENTS FIG. 1, ASSEMBLY, Trigger, Air Fitting - nailer
 |
View all Dewalt DW45RN manuals
Add to My Manuals
Save this manual to your list of manuals |
Page 8 highlights
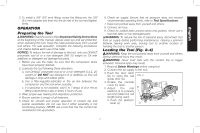
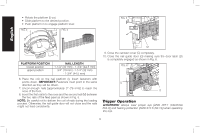
English COMPONENTS (FIG. 1) A. Top cap E. Contact trip B. Trigger F. Depth adjustment wheel C. Canister cover G. Nail guide door D. Door latch H. Shingle guide FIG. 1 B A C F H E D G ASSEMBLY WARNING: Disconnect air line from tool and remove fasteners from magazine before making adjustments or personal injury may result. Trigger WARNING: Keep fingers AWAY from the trigger when not driving fasteners to avoid accidental actuation. Never carry a tool with finger on the trigger. With the contact trip trigger (black) assembled, the tool will drive a fastener if the contact trip is bumped while the trigger is depressed. In accordance with the ANSI Standard SNT-101-2015, the DeWALT coil nailers are assembled with a black contract trip trigger. However, a gray sequential trip trigger kit is available. For a replacement trigger contact your authorized service center or call 1-800-4-DeWALT. Air Fitting This tool uses a 1/4" N.P.T. male plug. The inside diameter should be 0.180" (4.6 mm) or larger. The fitting must be capable of discharging tool air pressure when disconnected from the air supply. A 3/8" (9.5 mm) male quick connector coupling is available from DeWALT and may be used when a 1/4" (6.4 mm) supply line is not available. NOTE: A 3/8" (9.5 mm) supply line (and fittings) are required for maximum tool performance. WARNING: Always use couplings that relieve all pressure from the tool when it is disconnected from the power supply. Always use hose connectors that shut off air supply from compressor when the tool is disconnected. TO INSTALL AN AIR FITTING 1. Wrap the male end of the fitting with thread seal tape prior to assembly to eliminate air leaks. 2. To install a 1/4" (6.4 mm) fitting: screw it directly into the air inlet and tighten firmly. NOTE: If an adapter is in the air inlet, remove it prior to inserting the fitting. 6
-
 1
1 -
2
-
 3
3 -
 4
4 -
 5
5 -
 6
6 -
 7
7 -
 8
8 -
 9
9 -
 10
10 -
 11
11 -
 12
12 -
 13
13 -
14
-
15
-
16
-
17
-
18
-
19
-
20
-
21
-
22
-
23
-
24
-
25
-
26
-
27
-
28
-
29
-
30
-
31
-
32
-
33
-
34
-
35
-
36
-
37
-
38
-
39
-
40
-
41
-
42
-
43
-
44
-
45
-
46
-
47
-
48
-
49
-
50
-
51
-
52
 |
 |
