Denon S-101 Owners Manual - Eng/Span - Page 14
Connecting the supplied antennas, Connecting a TV, Setting the aspect ratio of your TV DVD function - s101
 |
UPC - 081757506731
View all Denon S-101 manuals
Add to My Manuals
Save this manual to your list of manuals |
Page 14 highlights
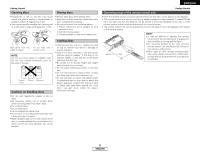
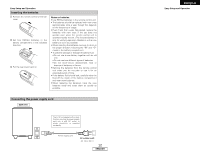
ENGLISH Easy Setup and Operation Connecting the supplied antennas FM indoor antenna AM loop antenna Black White Note to CATV system installer: This reminder is provided to call the CATV system installer's attention to Article 820-40 of the NEC which provides guidelines for proper grounding and, in particular, specifies that the cable ground shall be connected to the grounding system of the building, as close to the point of cable entry as practical. AM loop antenna assembly 1 2 3 Connection of AM antennas 1. Push the lever. 2. Insert the 3. Return the conductor. lever. Remove the vinyl tie and take out the connection line. 4 a. With the antenna on top any stable surface. Mount Bend in the reverse direction. b. With the antenna attached to a wall. Installation hole Mount on wall, etc. Easy Setup and Operation Connecting a TV • When making connections, also refer to the operating instructions of the TV or monitor. TV VIDEO IN WIDE/LB/PS 2 Setting the aspect ratio of your TV (DVD function only) • Choose settings according to the TV to be connected. • Set the WIDE/LB/PS switch on the ADV-S101's rear panel to select the aspect ratio of the TV. WIDE: Select this to play wide DVDs in the full-screen mode. LB: Select this to play wide DVDs in the letter box mode (with black strips at the top and bottom). PS: Select this to play wide DVDs in the pan & scan mode (with the sides of the picture cut off). Discs for which pan & scan is not specified are played in the letter box mode. • If the ADV-S101's image does not appear on the TV, check whether or not the PROGRESSIVE/INTERLACED switch on the ADV-S101's rear panel is set to "INTERLACED". If it is set to "PROGRESSIVE", set it back to "INTERLACED". • If your TV is of the conventional size (4:3), select "LB" or "PS". If you have a wide size TV (16:9), select "WIDE". 11 ENGLISH
-
 1
1 -
2
-
3
-
4
-
5
-
6
-
7
-
8
-
 9
9 -
 10
10 -
 11
11 -
 12
12 -
 13
13 -
 14
14 -
 15
15 -
 16
16 -
 17
17 -
 18
18 -
 19
19 -
20
-
21
-
22
-
23
-
24
-
25
-
26
-
27
-
28
-
29
-
30
-
31
-
32
-
33
-
34
-
35
-
36
-
37
-
38
-
39
-
40
-
41
-
42
-
43
-
44
-
45
-
46
-
47
-
48
-
49
-
50
-
51
-
52
-
53
-
54
-
55
-
56
-
57
-
58
-
59
-
60
-
61
-
62
-
63
-
64
-
65
-
66
-
67
-
68
-
69
-
70
-
71
-
72
-
73
-
74
-
75
-
76
-
77
-
78
-
79
-
80
-
81
-
82
-
83
-
84
-
85
-
86
-
87
-
88
-
89
-
90
-
91
-
92
-
93
-
94
-
95
-
96
-
97
-
98
-
99
-
100
-
101
-
102
-
103
-
104
-
105
-
106
-
107
-
108
-
109
-
110
-
111
-
112
-
113
-
114
-
115
-
116
-
117
-
118
-
119
-
120
-
121
-
122
-
123
-
124
-
125
-
126
-
127
-
128
-
129
-
130
-
131
-
132
-
133
-
134
-
135
-
136
-
137
-
138
 |
 |
