Dell U3224KB UltraSharp 32 6K Monitor - Simplified Service Manual - Page 15
positions to cover the wires and bracket as
 |
View all Dell U3224KB manuals
Add to My Manuals
Save this manual to your list of manuals |
Page 15 highlights
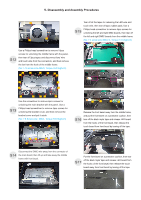
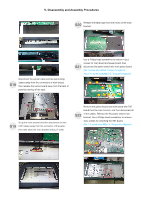
5. Disassembly and Assembly Procedures Paste 2pcs mylar tape to cover the camera unit, then S19 paste 2pcs aluminum foil on the specific position as the picture below shown. 1 Take two speakers to locate into the probers of the middle frame, then connect the two speakers wires and fix the wire on the frame with 1pcs acetate tape. S20 Connect the speaker wire to the main board and fix with 1pcs tape. Use a Philips-head screwdriver to tighten 8pcs screws for locking two speakers. (No.1~8 screw size=M3x8; Torque=6±1kgfxcm) 3 1 26 4 8 7 5 Connect 2pcs wires to 1pcs USB board, the locate the USB board into 1pcs bracket. Use a Philipshead screwdriver to tighten 1pcs screws for locking S21 the USB unit and wire with the bracket. Take 1pcs cover to assemble with USB unit, and then fix the wires with 2pcs tapes as the picture below shown. (No.1 screw size=M3x5, Torque=4±0.5kgfxcm) Use a Philips-head screwdriver to tighten 1pcs screw for locking the wire of USB unit with main bracket, then locate the USB unit to the hooks of middle frame, connect the wires to the main board, then S22 paste 1pcs mylar tape to fix the FFC connector. Use a Philips-head screwdriver to tighten 4pcs screws for locking the USB unit with middle frame. (No.1 screw size=M3x6, Torque=5±1kgfxcm; No.2~5 screw size=M3x4, Torque=3.5±0.5kgfxcm) 1 2 5 4 3 Take 1pcs fan's cover to assemble with the fan, then use a Philips-head screwdriver to tighten 2pcs screws for locking the fan's cover with the middle S23 frame. Paste 5pcs aluminum foil on the specific positions to cover the wires and bracket as the picture below shown. (No.1~2 screw size=M3x6, Torque=4±1kgfxcm) 1 2
-
 1
1 -
2
-
3
-
4
-
5
-
6
-
7
-
8
-
9
-
 10
10 -
 11
11 -
 12
12 -
 13
13 -
 14
14 -
 15
15 -
 16
16 -
 17
17 -
 18
18 -
 19
19 -
 20
20 -
21
-
22
-
23
-
24
-
25
-
26
-
27
-
28
-
29
-
30
 |
 |
