Dell OptiPlex Small Form Factor Plus 7020 Owners Manual - Page 70
Installing the media-card reader, Steps, Prerequisites, About this task, Next steps
 |
View all Dell OptiPlex Small Form Factor Plus 7020 manuals
Add to My Manuals
Save this manual to your list of manuals |
Page 70 highlights
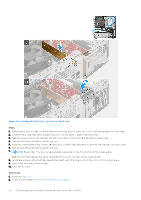
Steps 1. Remove the power-supply cables from the routing guides on the media-card reader bracket. 2. Remove the two screws (M3x5) that secure the media-card reader bracket to the system board and the chassis. 3. Disconnect the media-card reader from its connector (SD CARD) on the system board. 4. Lift and remove the media-card reader along with the bracket from the system. Installing the media-card reader Prerequisites If you are replacing a component, remove the existing component before performing the installation procedure. About this task The following images indicate the location of the media-card reader and provide a visual representation of the installation procedure. Figure 32. Installing the media-card reader Steps 1. Align the screw holes on the media-card reader with the screw holes on the system board and chassis. 2. Connect the media-card reader to its connector (SD CARD) on the system board. 3. Replace the two screws (M3x5) that secure the media-card reader bracket to the system board and the chassis. 4. Route the power-supply cables through the routing guides on the media-card reader bracket. Next steps 1. Install the disk-drive cage. 2. Install the 3.5-inch hard drive, if applicable. 3. Install the front bezel. 4. Install the side cover. 5. Follow the procedure in After working inside your computer. 70 Removing and installing Customer Replaceable Units (CRUs)
-
 1
1 -
2
-
3
-
4
-
5
-
6
-
7
-
8
-
9
-
10
-
11
-
12
-
13
-
14
-
15
-
16
-
17
-
18
-
19
-
20
-
21
-
22
-
23
-
24
-
25
-
26
-
27
-
28
-
29
-
30
-
31
-
32
-
33
-
34
-
35
-
36
-
37
-
38
-
39
-
40
-
41
-
42
-
43
-
44
-
45
-
46
-
47
-
48
-
49
-
50
-
51
-
52
-
53
-
54
-
55
-
56
-
57
-
58
-
59
-
60
-
61
-
62
-
63
-
64
-
 65
65 -
 66
66 -
 67
67 -
 68
68 -
 69
69 -
 70
70 -
 71
71 -
 72
72 -
 73
73 -
 74
74 -
 75
75 -
76
-
77
-
78
-
79
-
80
-
81
-
82
-
83
-
84
-
85
-
86
-
87
-
88
-
89
-
90
-
91
-
92
-
93
-
94
-
95
-
96
-
97
-
98
-
99
-
100
-
101
-
102
-
103
-
104
-
105
-
106
-
107
-
108
-
109
-
110
-
111
-
112
-
113
-
114
-
115
-
116
-
117
-
118
-
119
-
120
-
121
-
122
-
123
-
124
-
125
-
126
-
127
-
128
-
129
-
130
-
131
-
132
-
133
-
134
-
135
-
136
-
137
-
138
-
139
-
140
 |
 |
