Dell Inspiron 5490 Service Manual - Page 40
Installing the coin-cell battery
 |
View all Dell Inspiron 5490 manuals
Add to My Manuals
Save this manual to your list of manuals |
Page 40 highlights
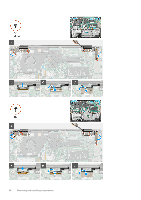
3. Note the speaker-cable routing and remove the speaker cable from the routing guides. 4. Disconnect the coin-cell battery cable from the system board. 5. Remove the coin-cell battery cable from the routing guides. NOTE: Depending on the configuration ordered, you may need to peel-off additional tape that adheres the coin-cell battery cable to the palm-rest and keyboard assembly. You may also need to temporarily remove the speaker cable, which routes through the same guides. 6. Pry the coin-cell battery off the palm-rest and keyboard assembly. Installing the coin-cell battery Prerequisites If you are replacing a component, remove the existing component before performing the installation procedure. About this task The following image indicates the location of the coin-cell battery and provides a visual representation of the installation procedure. Steps 1. Adhere the coin-cell battery to the palm-rest and keyboard assembly. 2. Route the coin-cell battery cable through the routing guides. NOTE: Depending on the configuration ordered, you may need to re-route the speaker cable through the same guides and re-apply the tape which adheres the coin-cell battery cable to the palm-rest and keyboard assembly. 3. Connect the coin-cell battery cable to the system board. 4. Route the speaker cable through the routing guides on the system board. 5. Adhere the tape that secures the speaker cable to the system board. 6. Connect the speaker cable to the system board. Next steps 1. Install the solid-state drive. 2. Install the wireless card. 3. Install the battery. 40 Removing and installing components
-
 1
1 -
2
-
3
-
4
-
5
-
6
-
7
-
8
-
9
-
10
-
11
-
12
-
13
-
14
-
15
-
16
-
17
-
18
-
19
-
20
-
21
-
22
-
23
-
24
-
25
-
26
-
27
-
28
-
29
-
30
-
31
-
32
-
33
-
34
-
 35
35 -
 36
36 -
 37
37 -
 38
38 -
 39
39 -
 40
40 -
 41
41 -
 42
42 -
 43
43 -
 44
44 -
 45
45 -
46
-
47
-
48
-
49
-
50
-
51
-
52
-
53
-
54
-
55
-
56
-
57
-
58
-
59
-
60
-
61
-
62
-
63
-
64
-
65
-
66
-
67
-
68
-
69
-
70
-
71
 |
 |
